Movers are here!
Movers are one of the more complicated items in TU, but they are extremely useful for making things move in your Condo. There’s currently 4 different movers I’ll cover in this guide.
Mover Simple - Moves items from one place to anotherMover Path - Moves items across a path
Mover Train - Moves items across like a train with station support
Mover Player Slide - Slides players down a water slide or path, slide optional
Each type of mover comes with its own unique settings.
Overview
- How To Use A Mover
- What Can Be Moved & How Do Movers Interact?
- Moving Groups of Items
- Disconnecting A Mover
- Pausing Movers
- Basic Movement Settings
- Loop Types
- Rotation
- Advanced Settings
- Mover Simple Examples
- Showcase: Goto Command
Advanced
Overview
How To Use a Mover
All Movers are IO items, which can be found in the Inventory under the Condo IO / Game Objects tab.

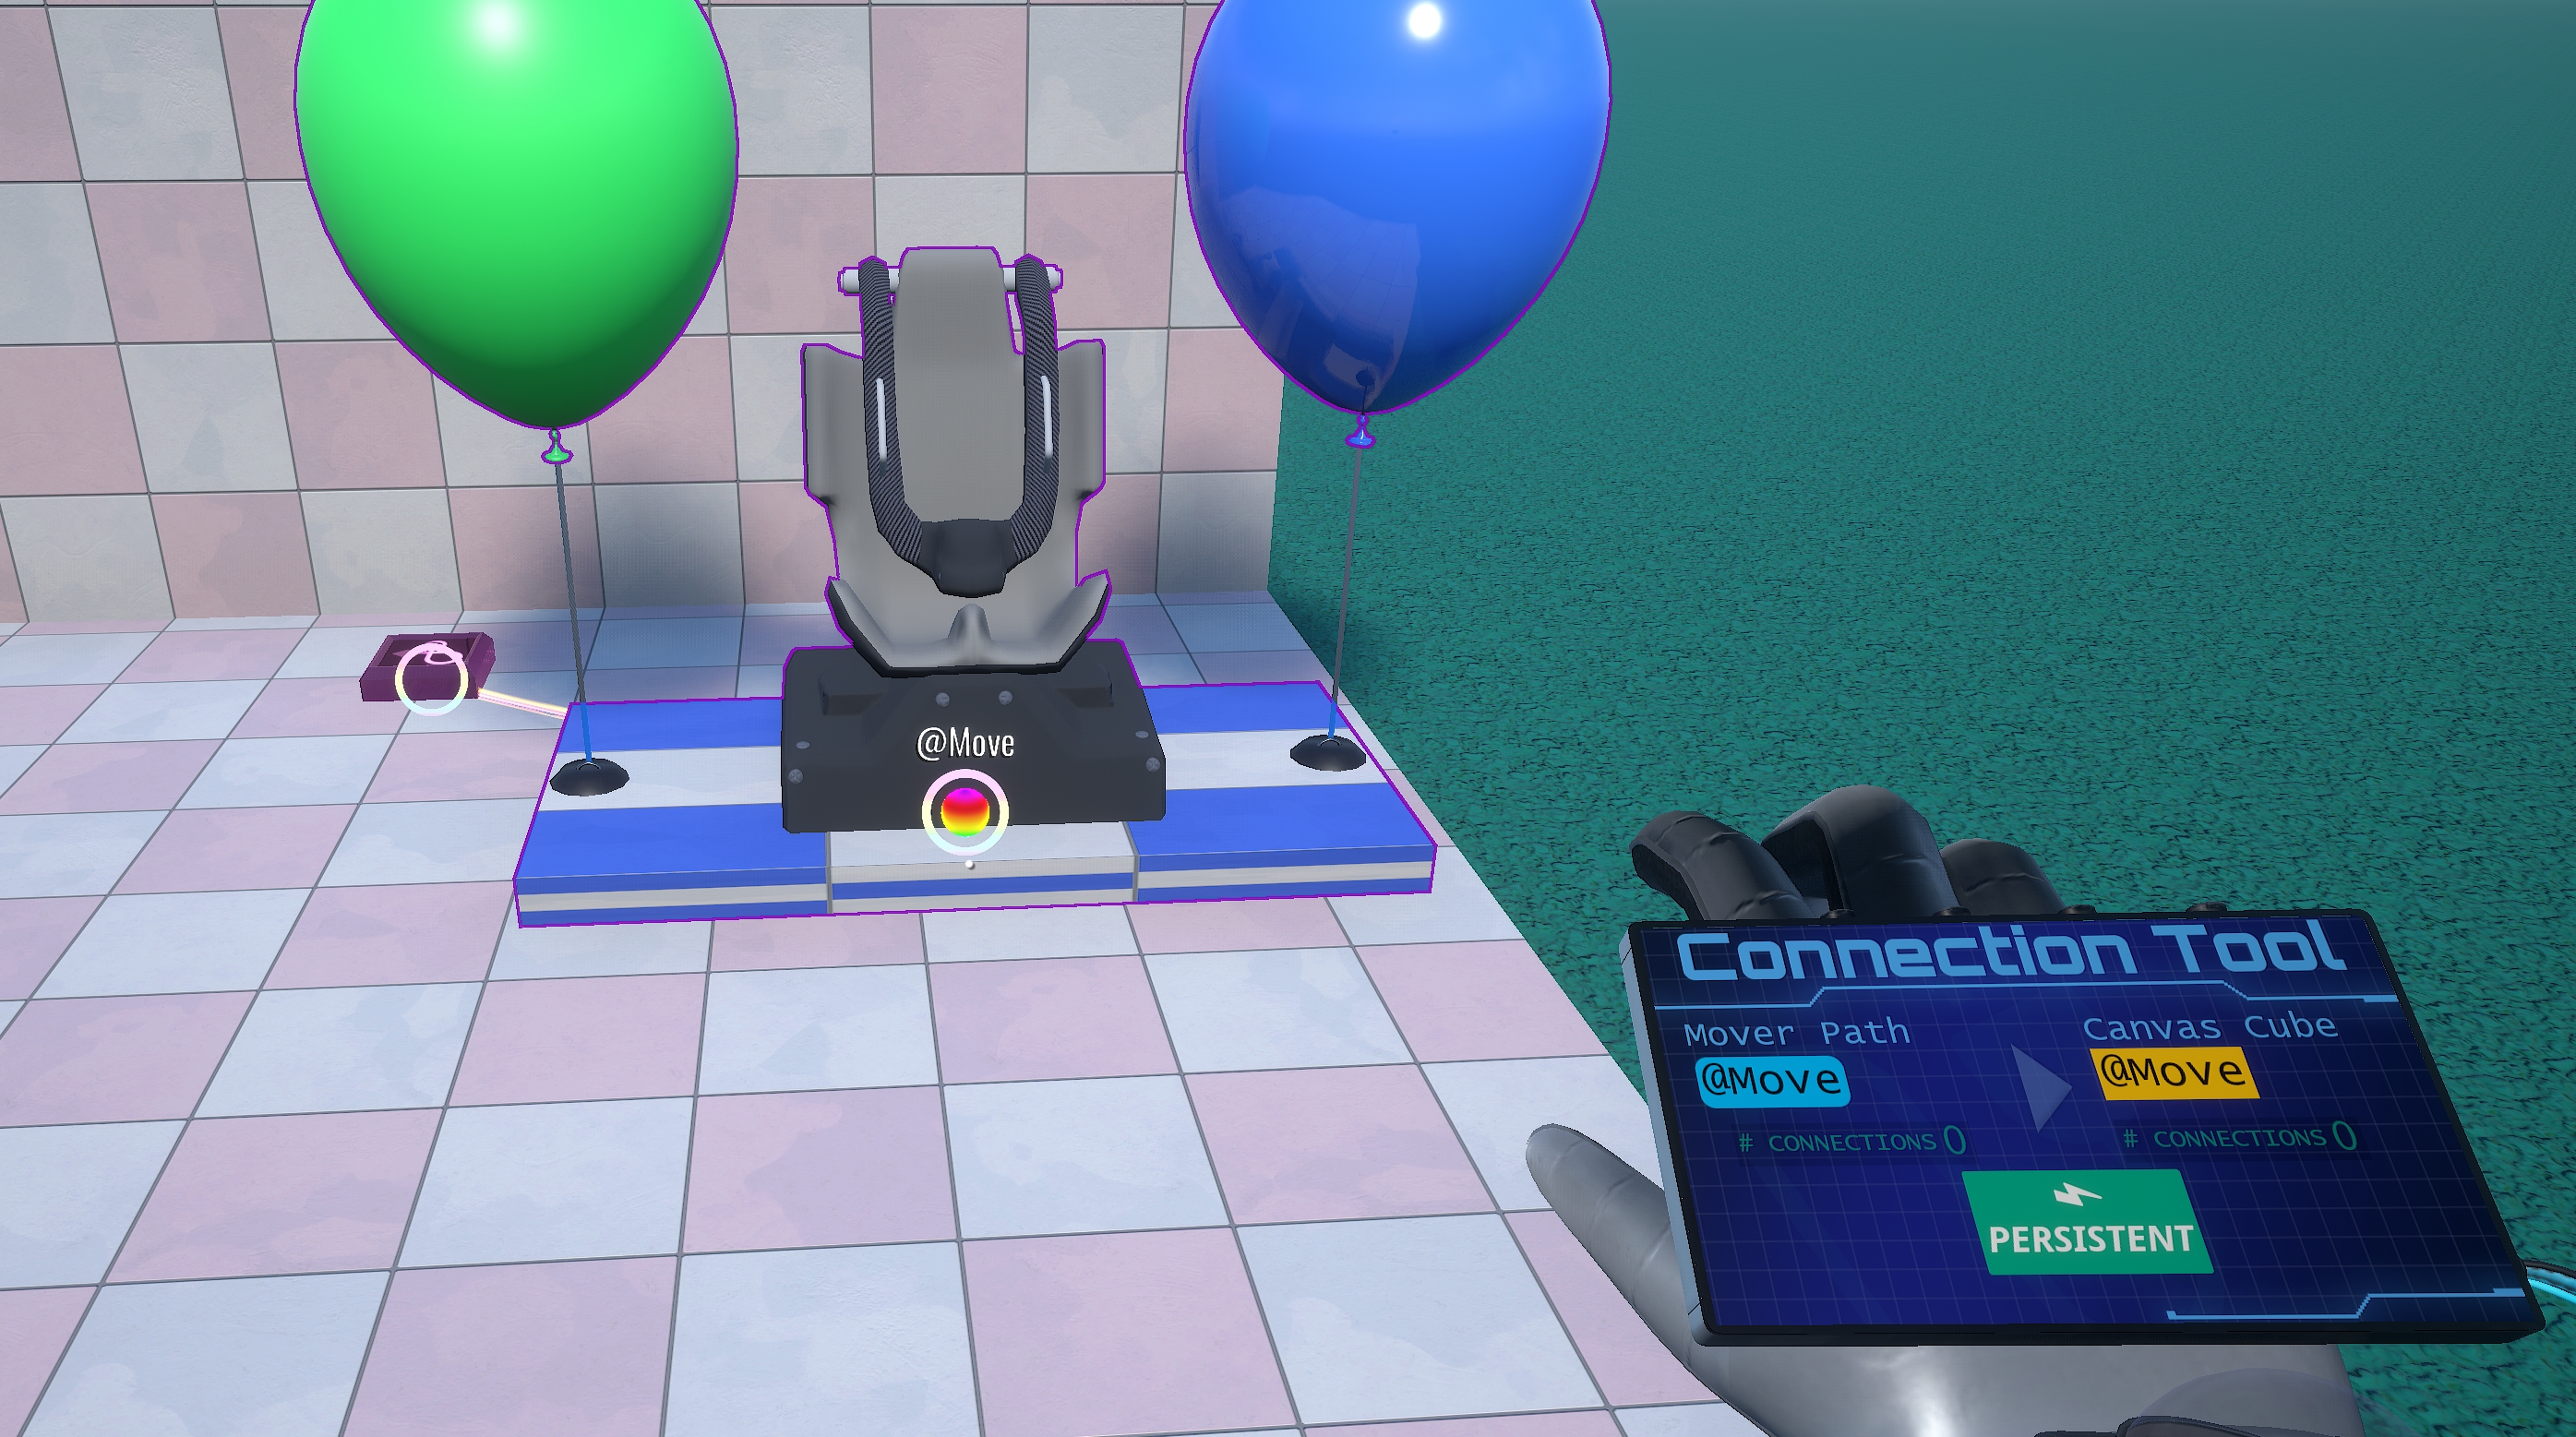
Once you place down the Mover, you just simply use the Connection Tool (Tower Glove) to connect a Mover to an item you want to move.
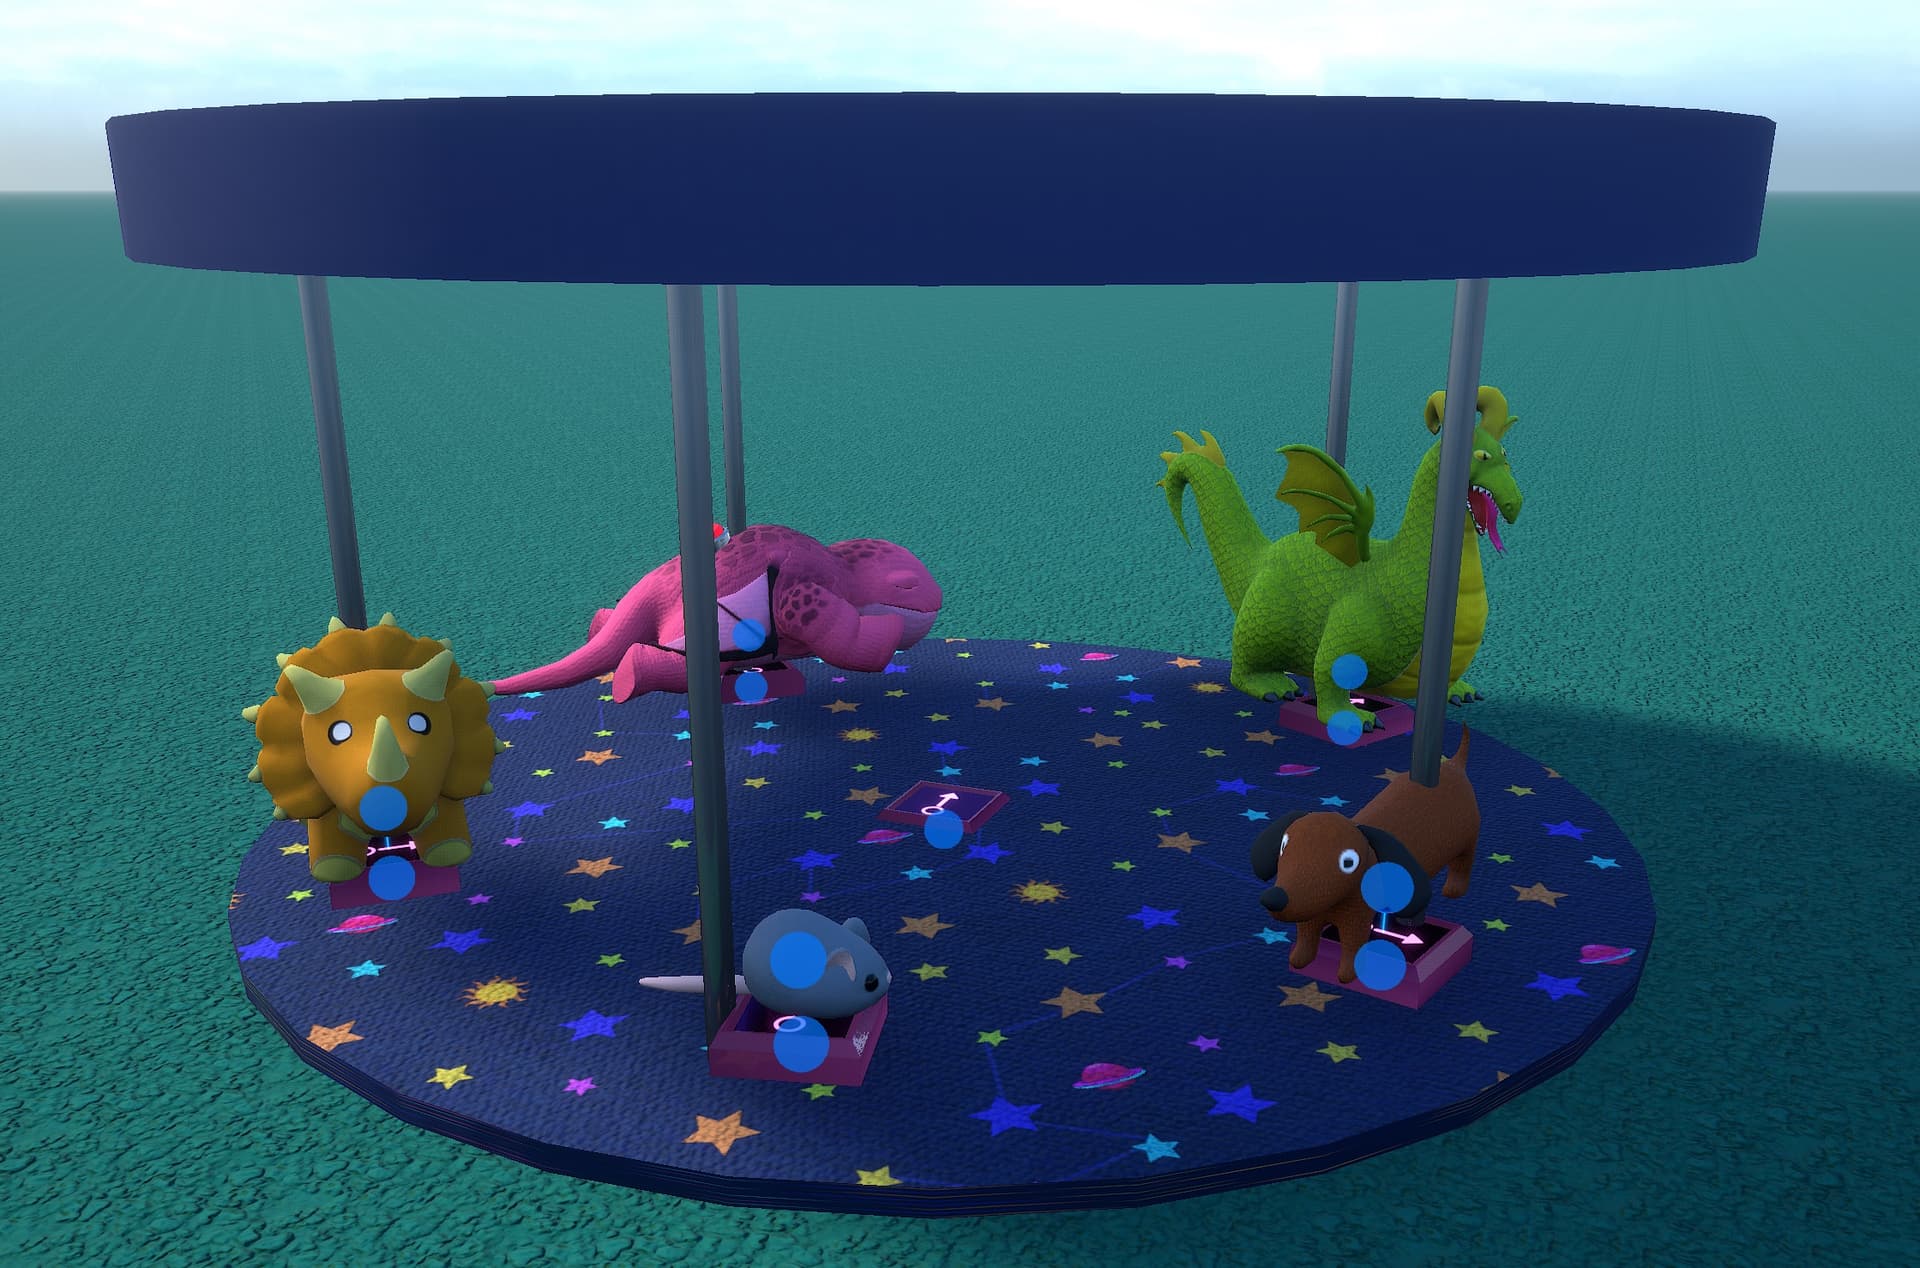
Movers can move individual items or an entire group of items!
What Can Be Moved & How Do Movers Interact?
Pretty much every item, excluding physics items, can be moved by a Mover.
Movers can interact with physics and players. Movers can push players. Players can stand on Movers and be attached to the Mover while standing on them (until they jump off).
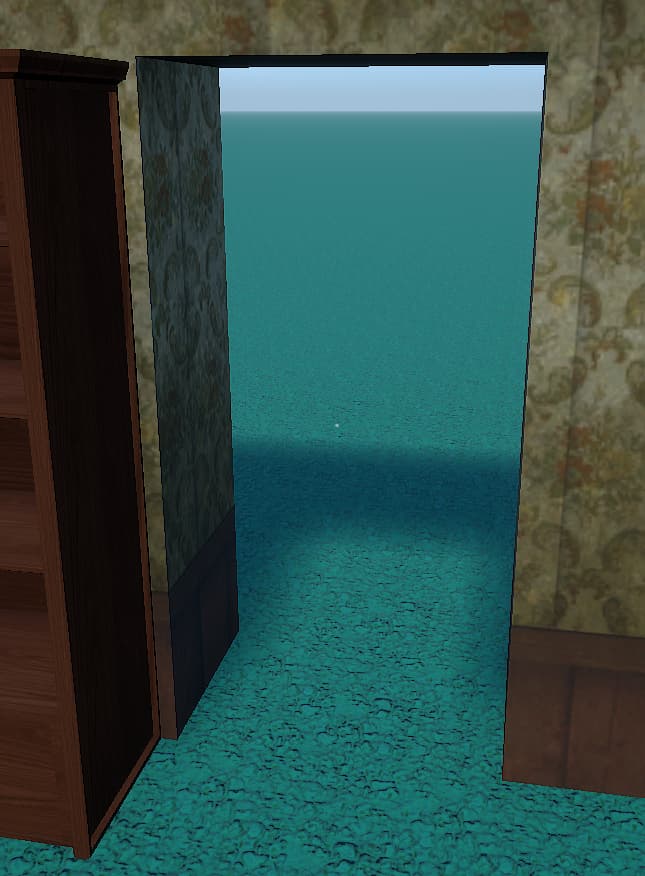
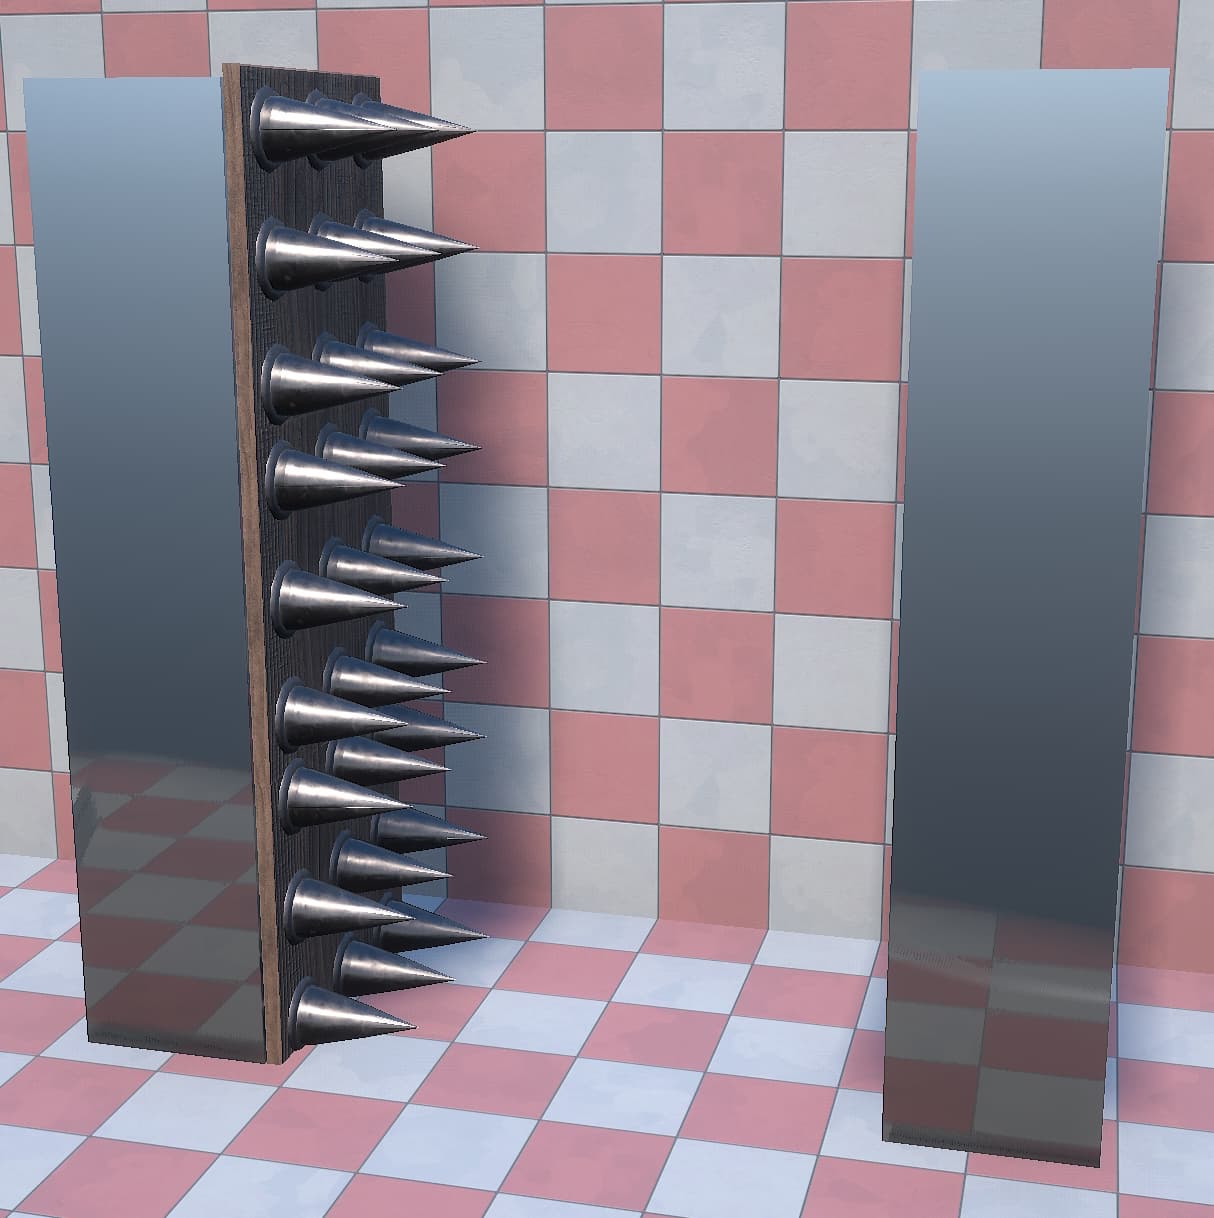
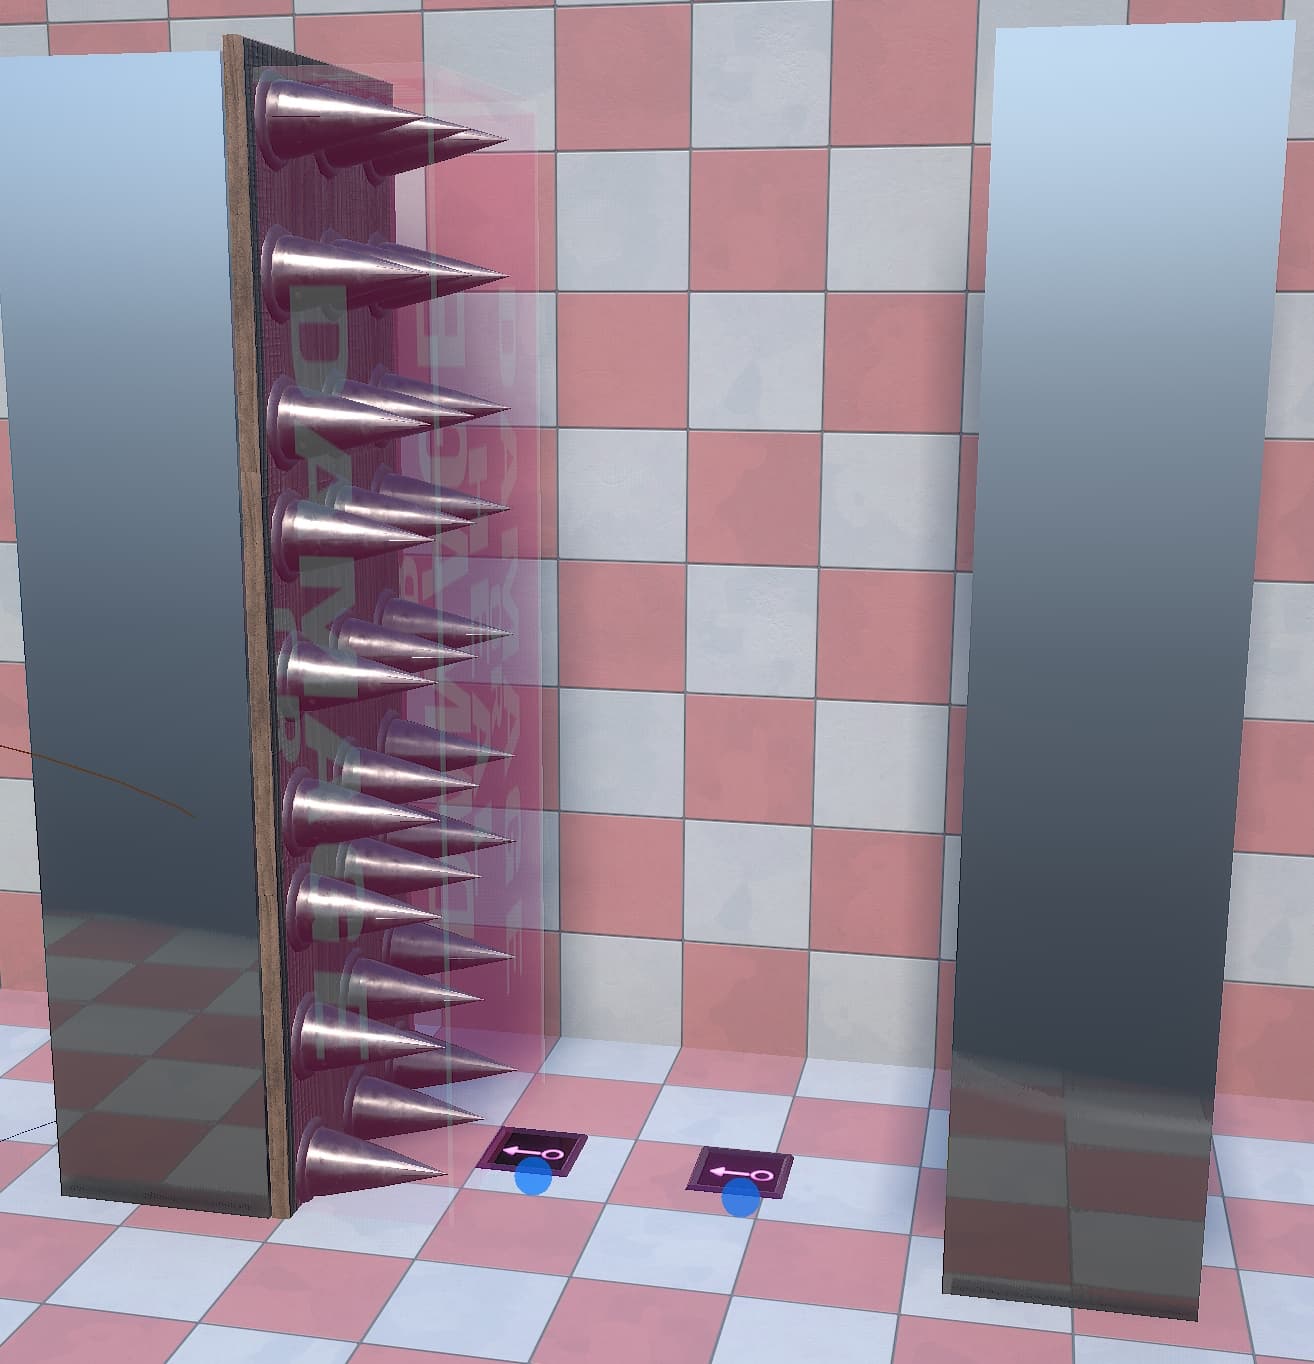
You can use Movers to make moving platforms, custom doors, traps, rides, and even other creative uses such as moving sound emitters and particle FX.
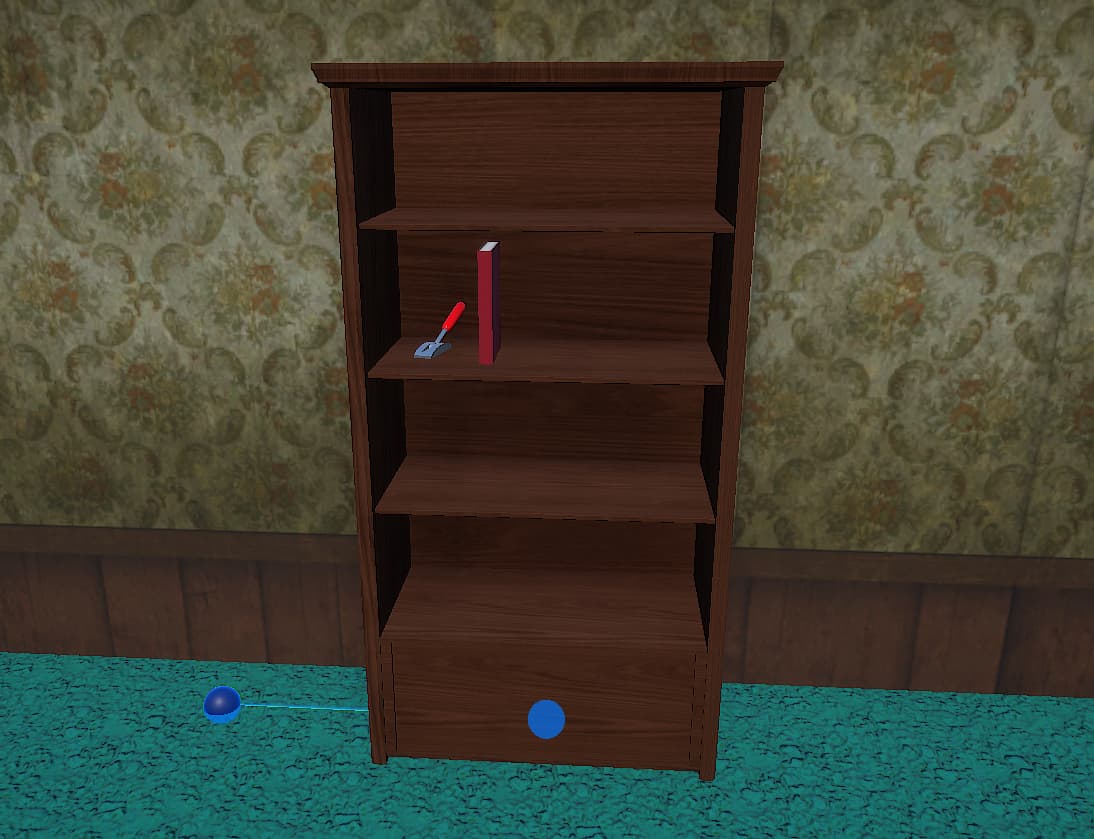
Moving Groups of Items
To move groups of items, simply make a Group by selecting the items while holding Shift, then press G to create a group. Once you have a Group made, you simply connect the Mover to the item of the group that you want to set the Mover origin to. Usually, you’ll want to select the base item of the group, like a platform.
Remember, pretty much ANY item can be moved by a Mover (with the exception of physics items), and that goes for grouped items as well!
Disconnecting A Mover
Items can easily be disconnected from a Mover by going into the Mover itself, going to connections, then removing the connection using the X on the right. Items will be placed back to their original position before they were attached to the Mover.

Pausing Movers
You can edit items that are currently being moved, that is, if you can grab them. It’s quite difficult to update items while they are moving!
Luckily, you can pause all Movers so you can edit your items and quickly resume the Movers again using the scoreboard. Press Tab to show the scoreboard and there will be a Play/Pause button (if you have IO permission / are the Condo owner).
When you pause Movers, it’ll temporarily detach the items from your Mover, allowing you to adjust items or add new items to the Group. Just make sure that you regroup the items when you are done before resuming movement.
You can move individual items that are grouped by disabling the Edit Group Selection setting which is in the inventory settings.
You can also use the CTRL+Shift+G hot key to toggle group selection.
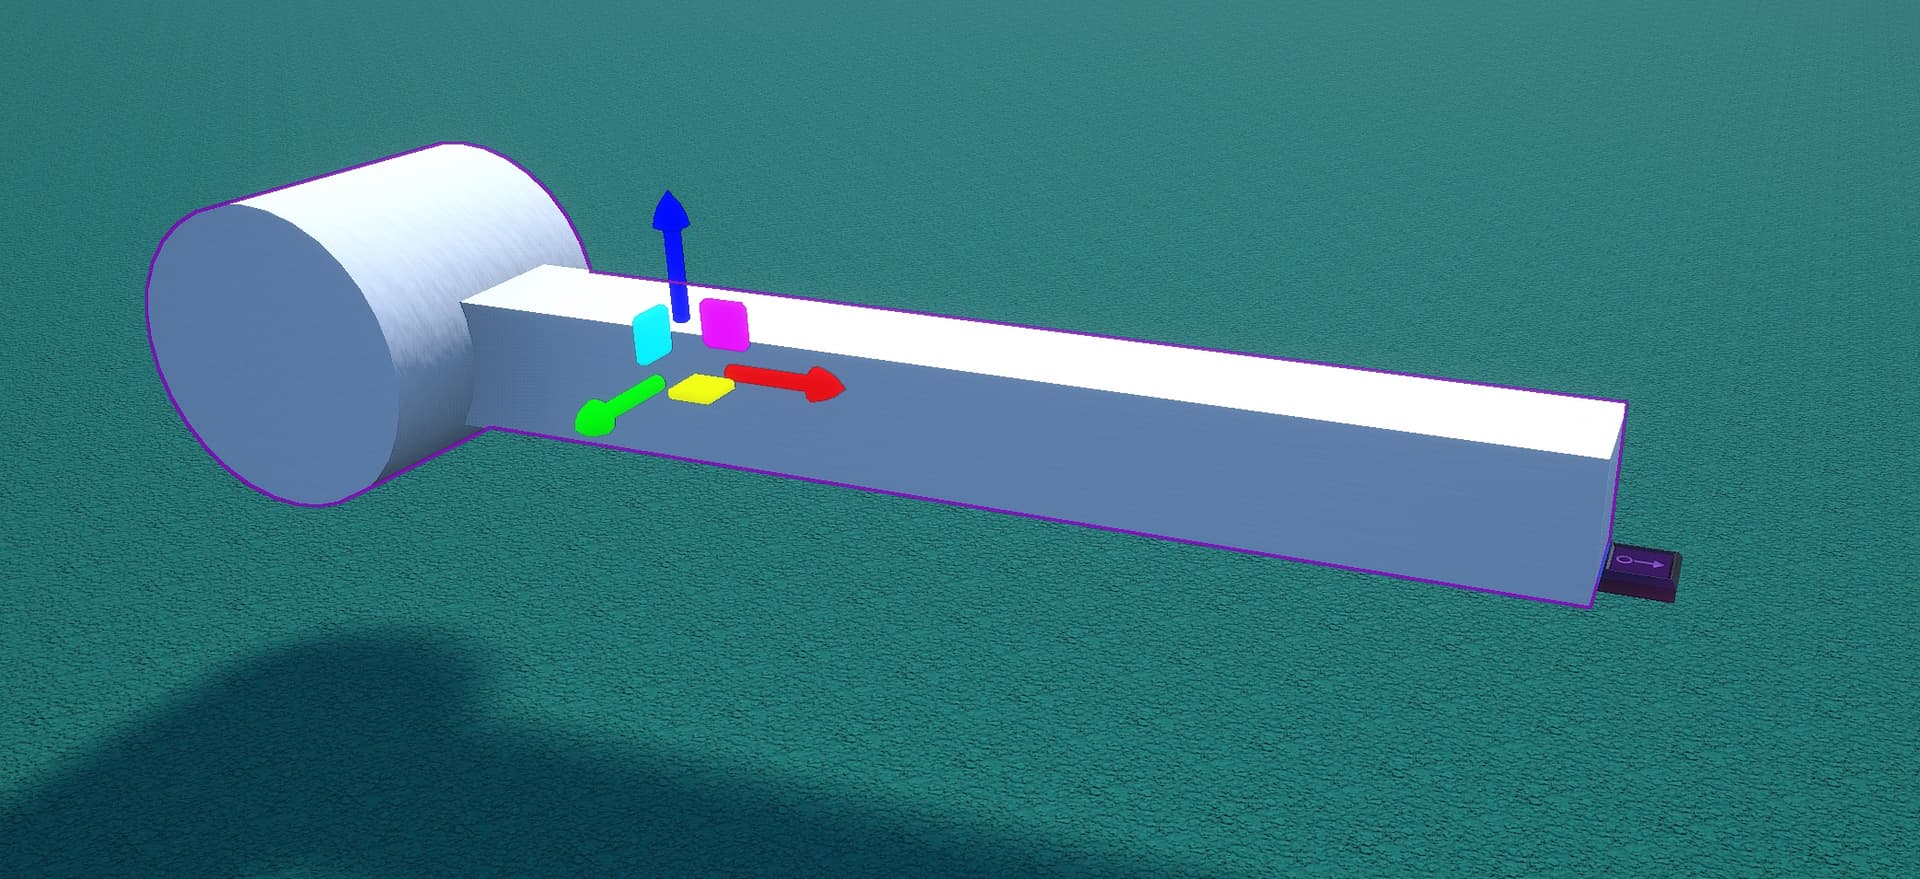
Mover Simple
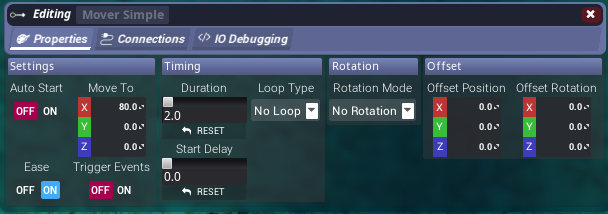
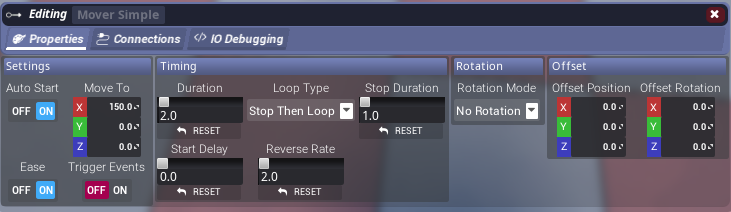
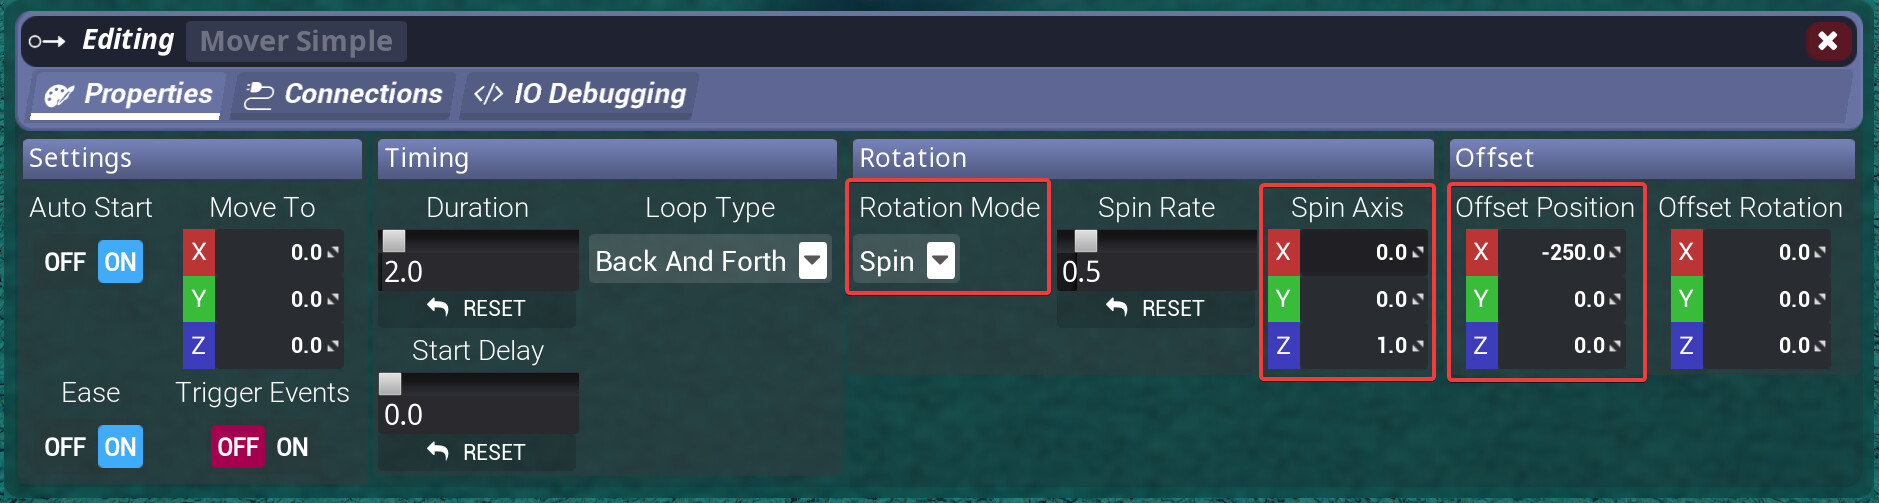
Your basic Mover. This Mover moves items from one place to another place. It comes with options to Move To a location, Loop, Rotate, and IO inputs.

Basic Movement Settings
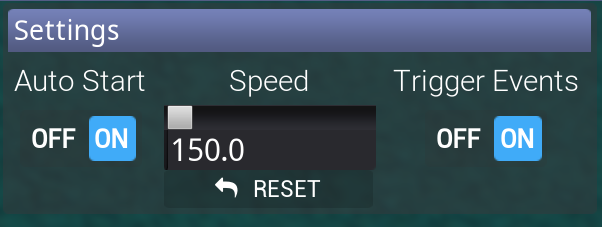
- Auto Start: Starts the Mover on map load. You can toggle this one on to see the Mover in action immediately.
- Move To: Moves the item to another position, relative to the Mover itself.
- Duration: How long it takes for the Mover to reach its destination.
Loop Types
- No Loop: Mover will move to its destination and stop. Can be interacted with IO events.
- Back And Forth: Mover will move to its destination then back, endlessly.
- Stop Then Loop: Mover will move to its destination, wait X seconds, then return back.
Rotation
- No Rotation: Mover does not rotate.
- Spin: Spins the mover constantly, with a spin rate setting and spin IO events.
- Rotate To: Rotates the mover from and to a rotation.
- Direction: Rotates the mover in the direction it is moving towards.
- Face Towards: Rotates the mover to face towards another item.
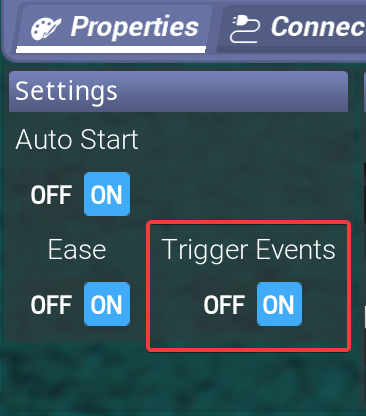
Advanced Settings
- Trigger Events: Used when you want a Mover to interact with Trigger Volumes / Players.
- Start Delay: When to start the Mover should Auto Start be enabled.
- Offset Position and Rotation: Useful when you want to offset the item or move its pivot point for rotations.
Mover Simple Examples
Spin
Rotate Back And Forth
Stop Then Loop
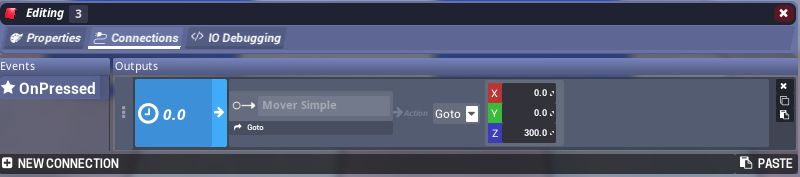
Showcase: Goto Command
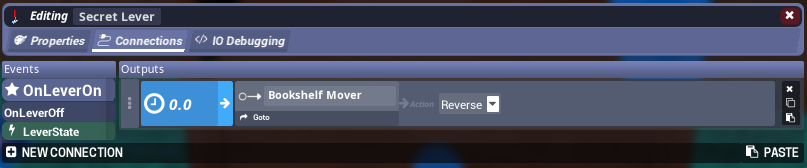
Mover Simple comes with a powerful IO command - Goto.
This command will override any current movement (except spin settings) and make the item travel to a relative position on demand.
With some buttons, you can make an elevator with Goto.
In this example, the buttons are just calling:
Button 1 → Mover Simple → Goto ( 0, 0, 0 )
Button 2 → Mover Simple → Goto ( 0, 0, 150 )
Button 3 → Mover Simple → Goto ( 0, 0, 300 )
Button 4 → Mover Simple → Goto ( 0, 0, 450 )
The Mover figures out the rest for you.
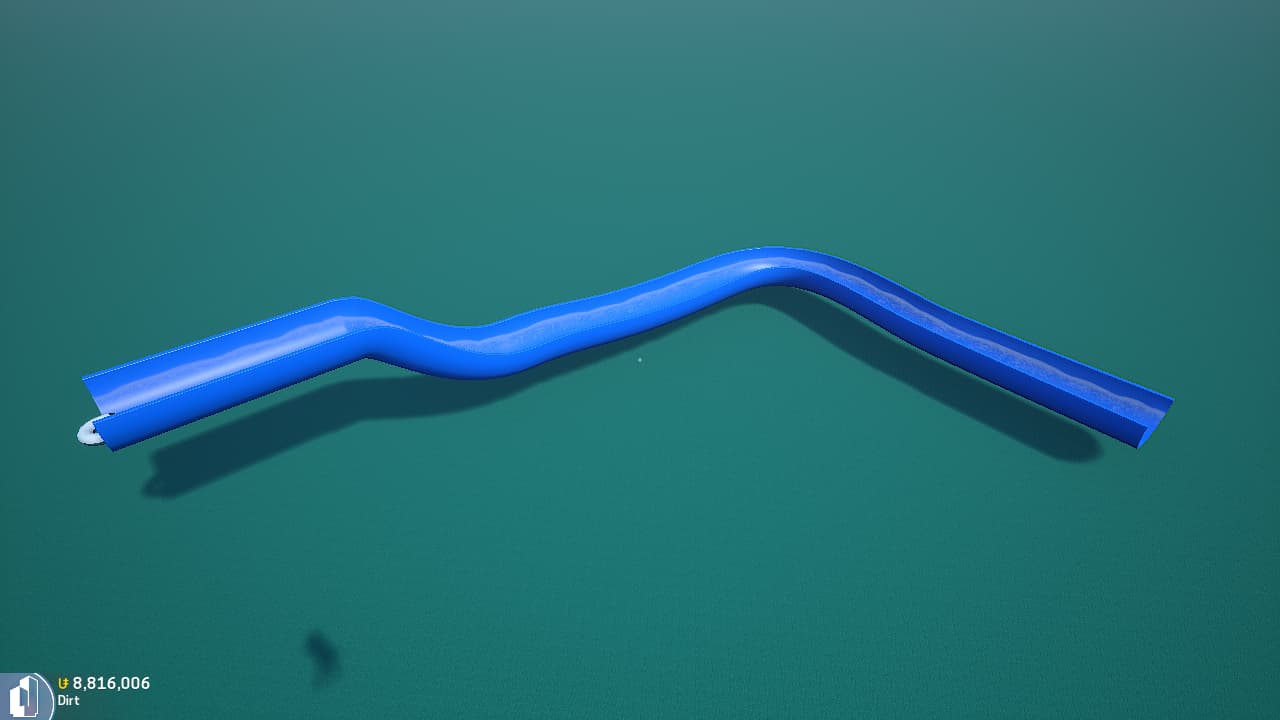
Mover Path
These Movers are useful for non linear movement, such as going across a path or curves. Mover Path follows a spline path that you can edit and add as many points as you may need.
Basic Settings
- Auto Start: Starts the Mover on map load. You can toggle this one on to see the Mover in action immediately.
- Duration: How long it takes for the Mover to travel the path.
- Closed Loop: Will loop the path back to the beginning, effects how the Loop Types act slightly.
Loop Types
- No Loop: Mover will move to its destination and stop. Can be interacted with IO events.
- Back And Forth: Mover will move to its destination then back, endlessly.
- Stop Then Loop: Mover will move to its destination, wait X seconds, then return back.
Rotation
- No Rotation: Mover does not rotate.
- Spin: Spins the Mover constantly, with a spin rate setting and spin IO events.
- Direction: Rotates the Mover in the direction it is moving towards.
- Face Towards: Rotates the Mover to face towards another item.
Advanced Settings
- Trigger Events: Used when you want a Mover to interact with Trigger Volumes / Players.
- Start Delay: When to start the Mover should Auto Start be enabled.
- Offset Position and Rotation: Useful when you want to offset the item or move its pivot point for rotations.
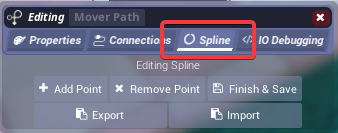
Editing Paths
To edit the path, there’s a new tab called Spline. You can also edit the path by right clicking on the Mover and hitting Edit Spline.
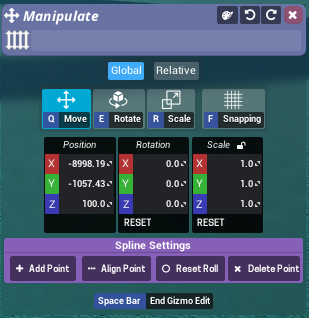
Once you have done this, you’ll see spline points show up on the Mover. These points can be moved and adjusted. You can scale them to adjust the curve between points and rotate them to adjust the roll.
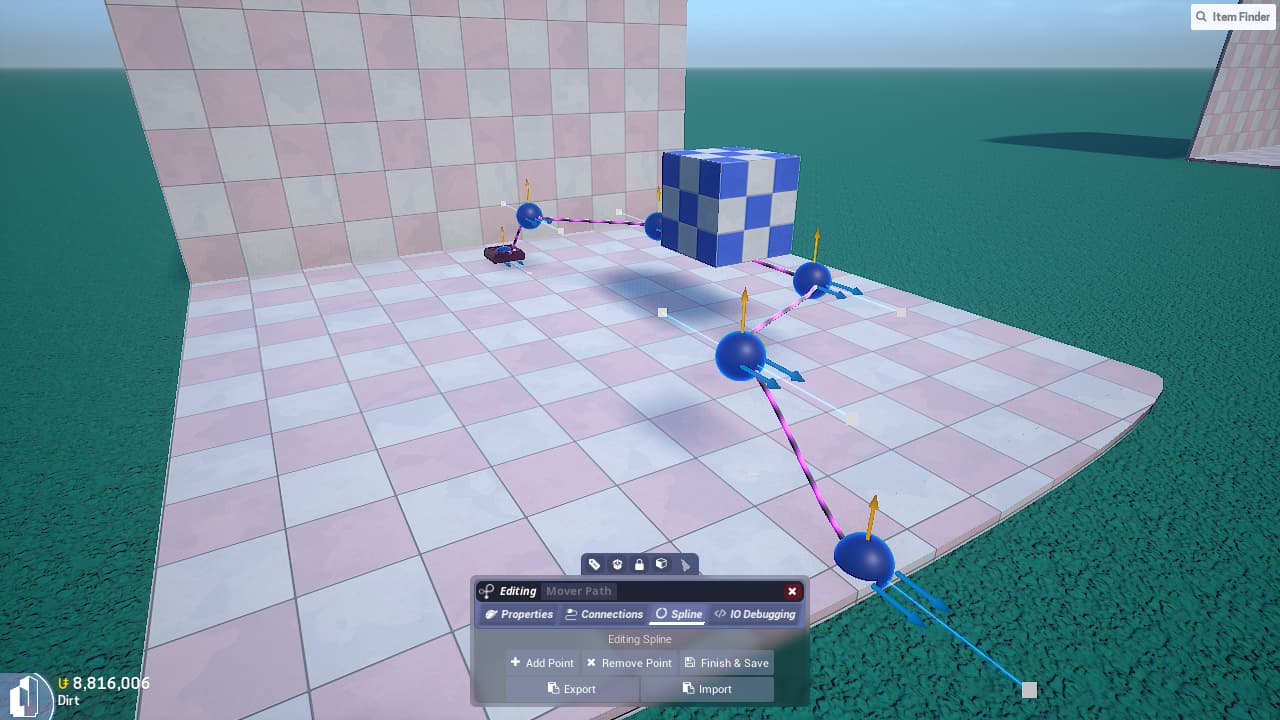
You can also click on individual spline points, which have a couple useful tools:
- Add Point: Adds a new point in front of the current point.
- Align Point: Aligns the point to the point in front, useful to straighten points.
- Reset Roll: Resets the roll to 0.
- Delete Point: Removes the current point, while keeping the rest of the points.
When you are done editing the spline, you MUST hit Finish & Save (or Save Spline with the right click menu) to submit the spline to the server and save the data to the Mover. If you do not do this, other players will not see the path update.
Exporting/Importing Paths
You can also Export Paths to duplicate them to other Movers, or to share with the community! The Export Path button will export the Path to your clipboard. You can also import paths by copying them into your clipboard and clicking on Import Path.
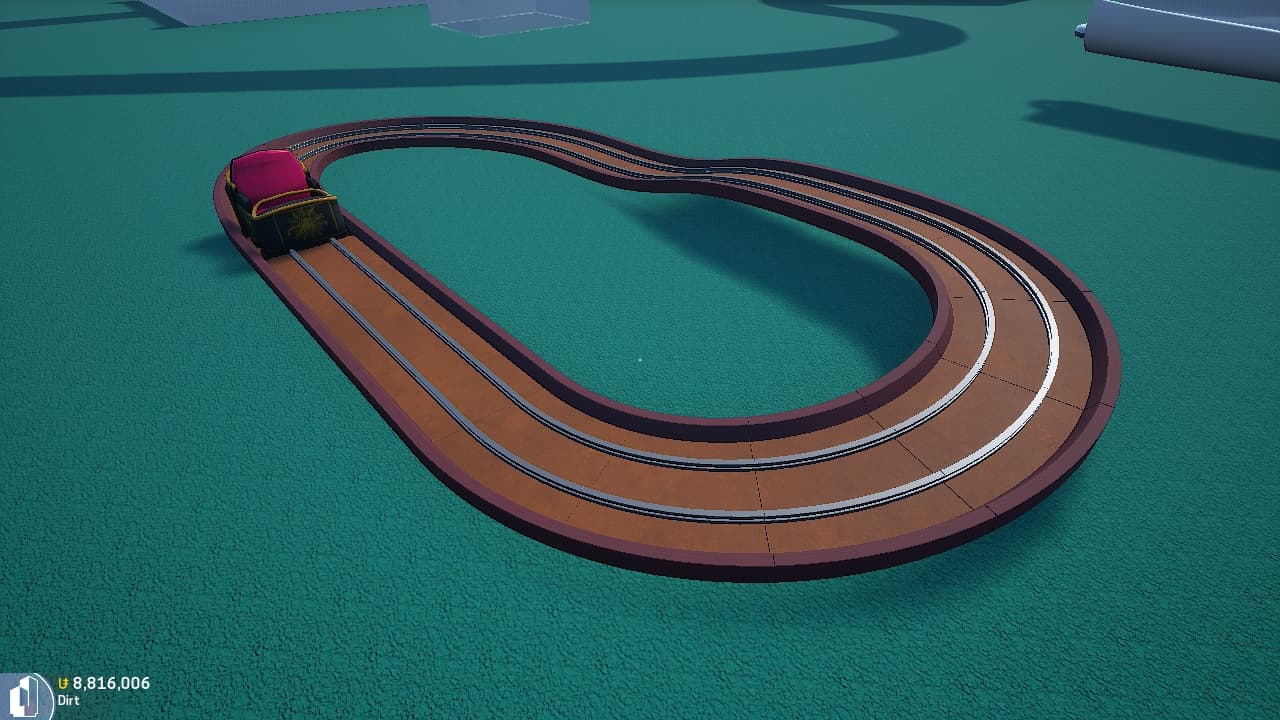
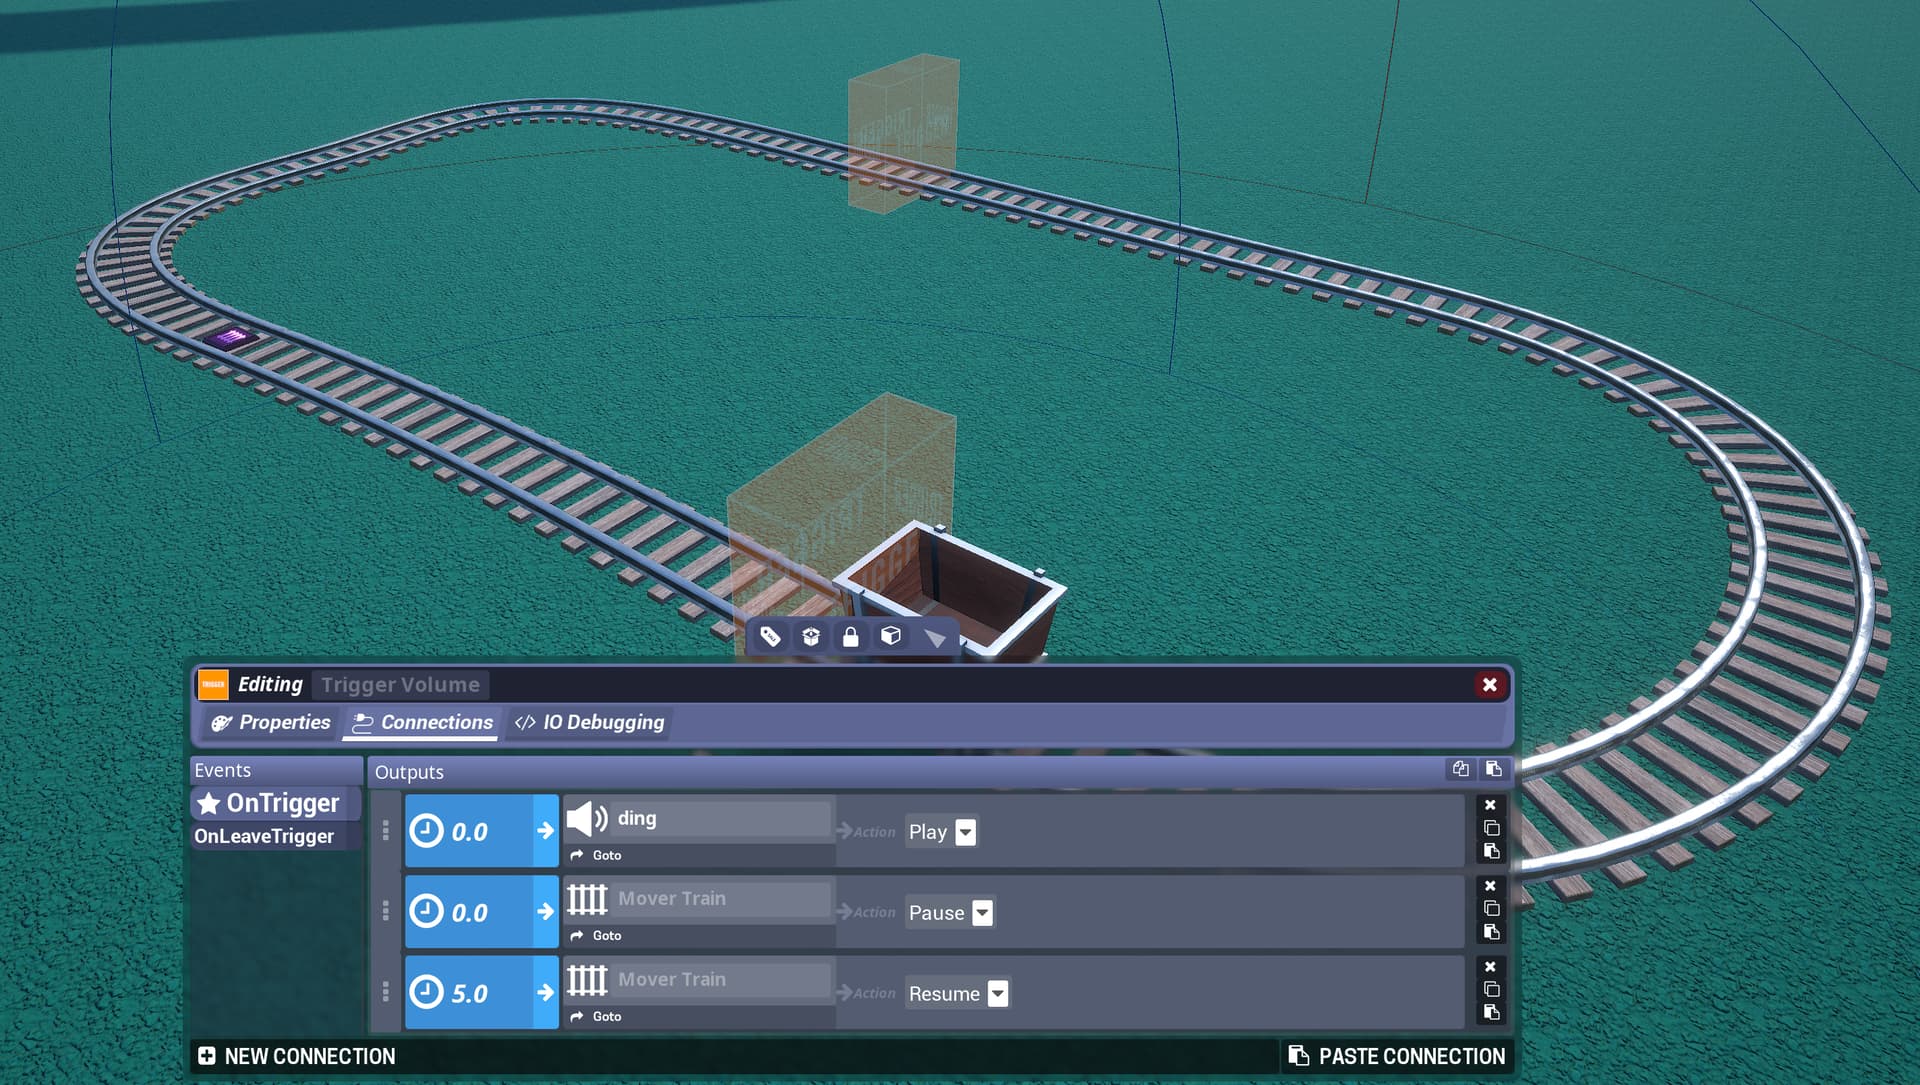
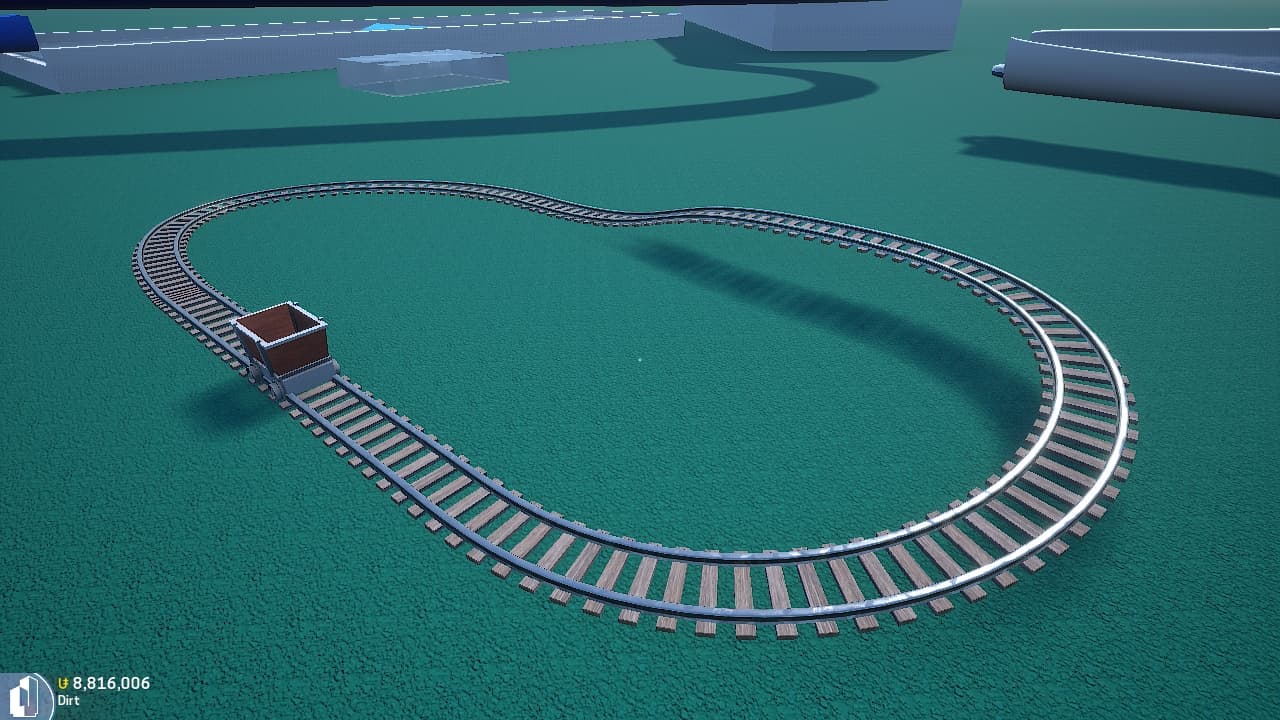
Mover Train
This Mover is similar to Mover Path, but amped up quite a bit! This Mover is focused on providing train / rollercoaster functionality. It will automatically handle acceleration down hills, and deceleration when climbing up hills. We use this for Dark Voyage and the Poseidon Roller Coaster and now it is yours to master!
Just like Mover Path, it uses the spline path system. Mover Trains however, must be a closed loop!
Mover Train also comes with an optional visual track!
Basic Settings
- Auto Start: Starts the Mover on map load. You can toggle this one on to see the Mover in action immediately.
- Speed: How fast does the train propel forward when not influenced by hills. This is also called the “Cruising Speed”.
- Station Wait Time: How long does the train wait at the station before continuing to move again.
Train
- Cart Type: Sets the type of cart this train has.
- Custom: You can attach a group of items just like Mover Simple/Path. Currently only supports 1 cart at time.
- Coaster: A roller coaster cart with 4 seats.
- Dark Voyage: The car used in Dark Voyage with 4 seats.
- Dark Ride: A dark ride car with 2 seats.
- Golf Cart: A golf cart with 4 seats.
- Minecart: A minecart with 1 seat.
- Shopping Cart: A shopping cart with 1 seat.
- Cart Number: You can have up to 10 carts on a train. Does not work with Custom cart type yet.
- Cart Spacing: Adjust how much space the carts are spread across the train when moving.
- Track Type:
- None: No visible track.
- Train: Standard train track.
- Coaster: Coaster track, sized for Coaster Cart Type.
- Dark Voyage: A floor based track, sized for Dark Voyage.
- Dark Ride: A floor based track, smaller sized.
- Monorail: A monorail track.
- Simple: A simple tube track.
Rotation
- Direction: Rotates the cart in the direction it is moving towards.
- Spin: Spins the cart constantly, with a spin rate setting and spin IO events.
- Face Towards: Rotates the first cart to face towards another item. This currently only works with the first cart in the train.
Advanced Settings
- Trigger Events: Used when you want a Mover to interact with Trigger Volumes / Players.
- Offset Position and Rotation: Useful when you want to offset the cart or move its pivot point for rotations.
Adjusting Speed Dynamically
One very common element in roller coasters is speeding up (maglev) or slowing them down (brakes). If you enable “Trigger Events”, you can use Trigger Volumes and set the speed of the Mover Train using the SetSpeed IO input.
Keep in mind that the train does have friction simulated, if you need to stop the train on a dime, there is a Stop IO input and a Resume IO input.
Mover Player Slide
One of the more simple and straight forward Movers. This one is designed for slides. You can turn off displaying the slide if you like.
Players enter the mover by pressing Enter and they are then put on a set path down the slide.
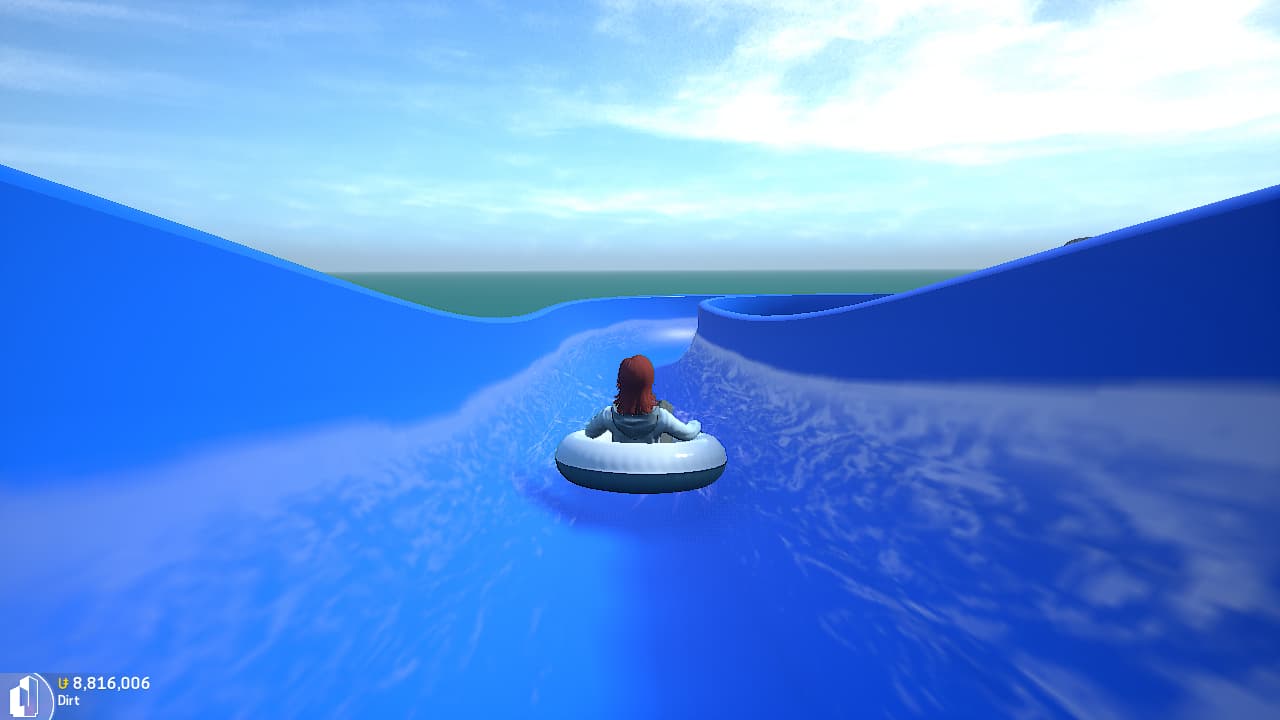
Uses the same pathing tool that Mover Path/Train uses.
Interaction with IO Events
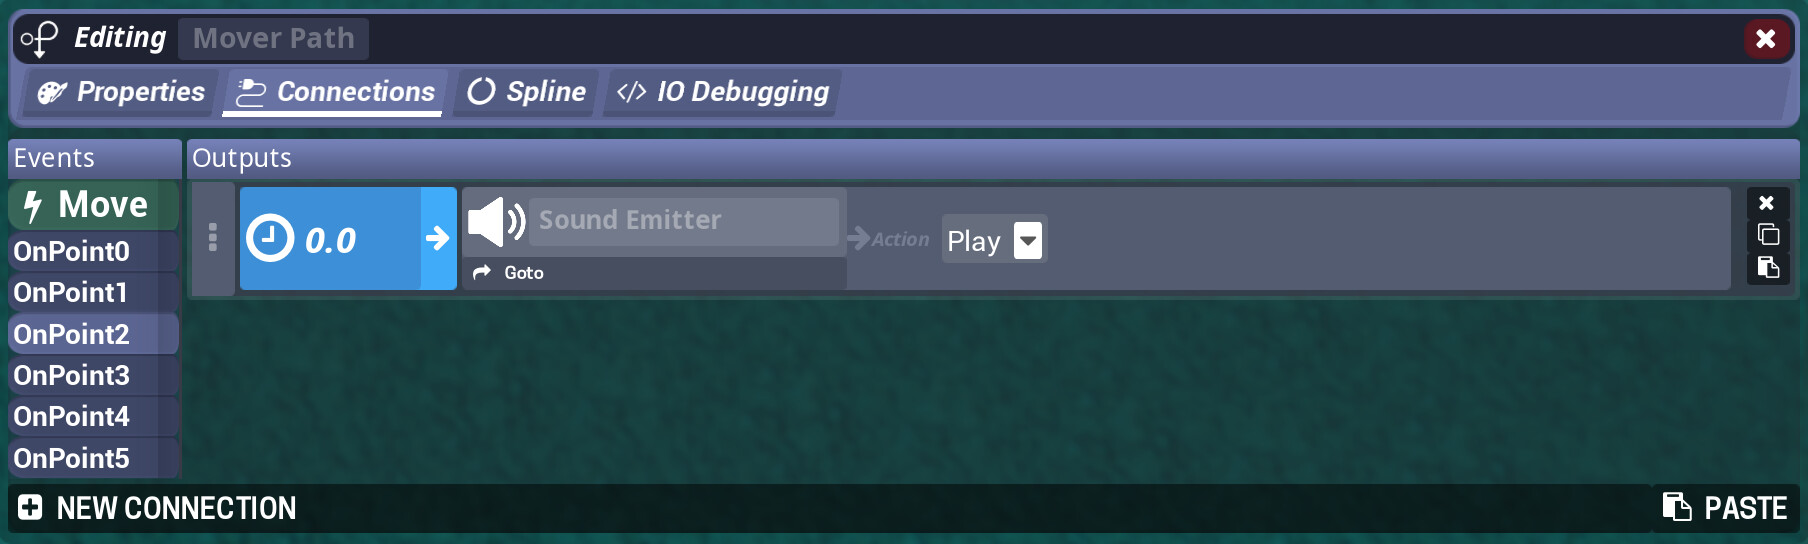
Movers come with various IO events, such as Start, Stop, Pause, Resume, Reverse, Goto, Start Spin, Stop Spin, etc.
You can use these IO events to control how you want Movers to work, or to trigger a Mover with a Trigger Volume.
Interaction with Trigger Volumes & Players
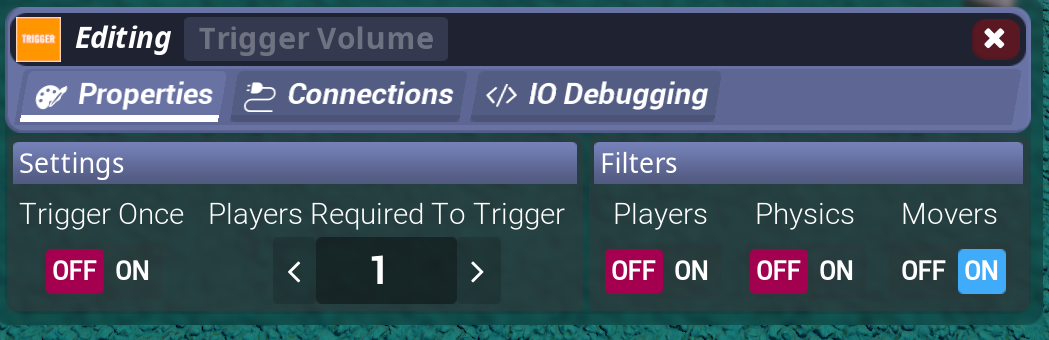
Movers can interact with Trigger Volumes, but by default they do not. You’ll need to first enable “Trigger Events” in the Mover properties.
Note: Some items such as the Spikeboard or Automatic Doors will require “Trigger Events” to function while attached to Movers.
Trigger Volumes also come with a filter to filter specific objects, such as Movers. You can disable Player Filter then enable Mover filter to have Trigger Volumes that only trigger with a Mover.
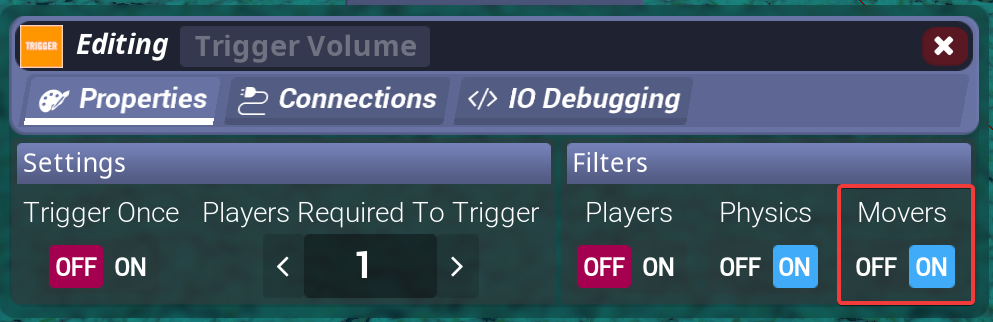
Mover Trains and Mover Paths are also compatible with Trigger Volumes!
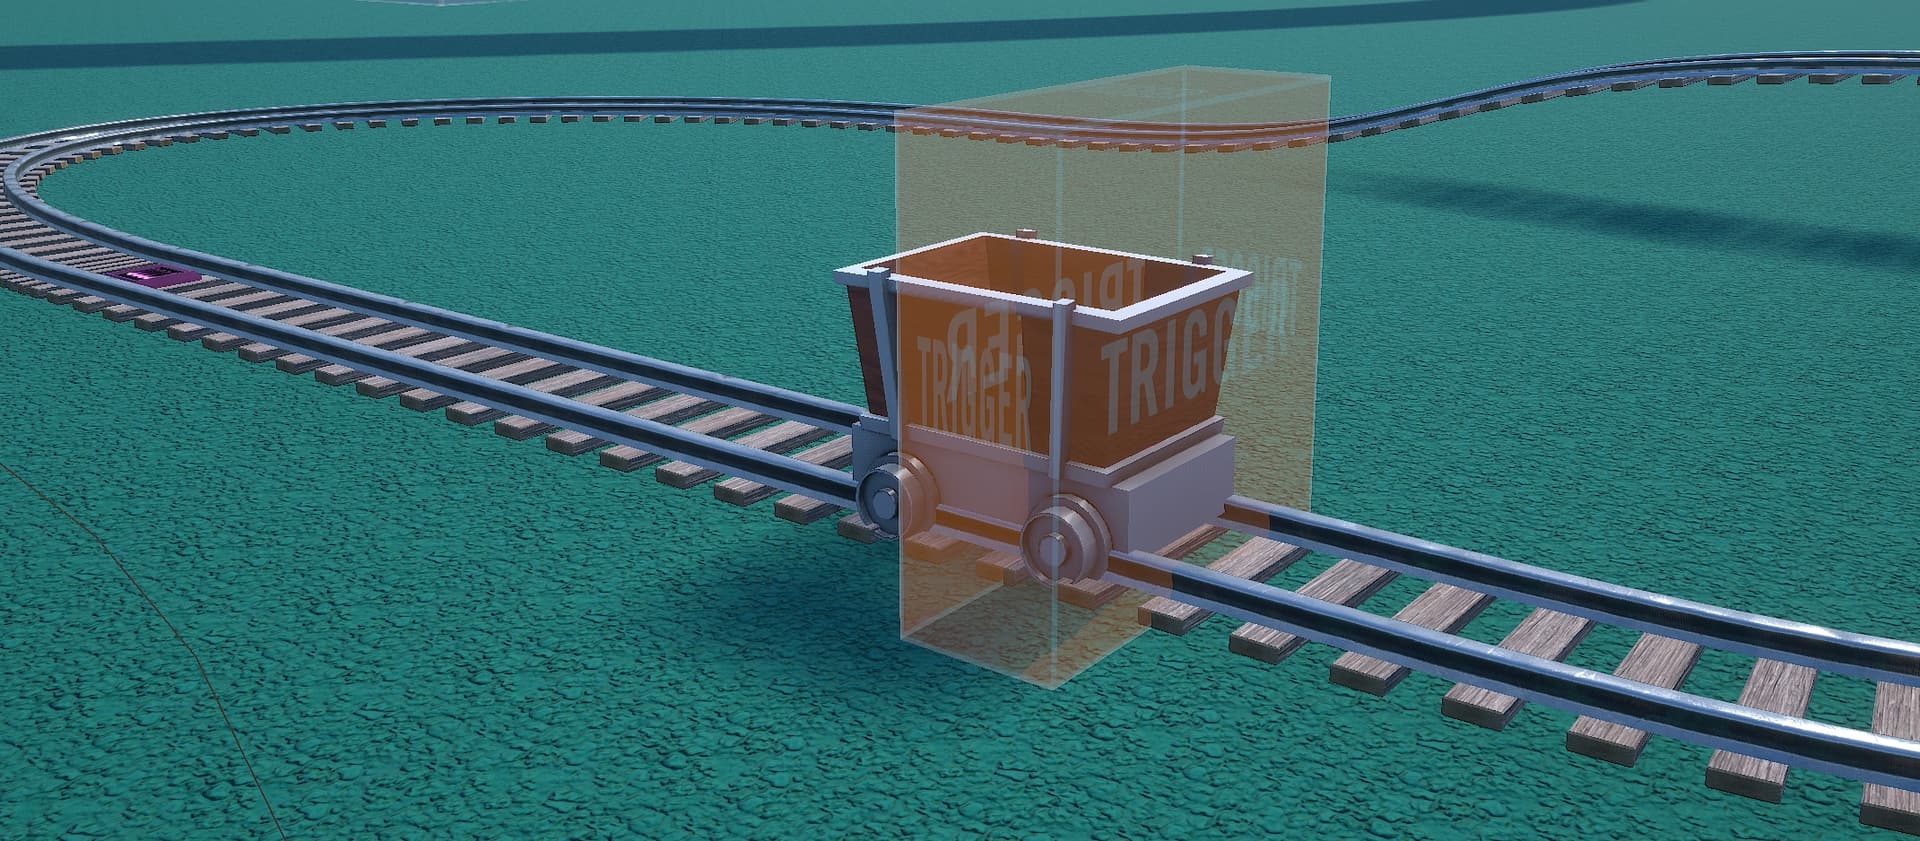
Mover Paths come with a unique way to trigger IO events, if you wish to use this instead of Trigger Volumes. Each path point will automatically generate an IO output for you to use when the Mover has passed through that path point. These path points don’t require Trigger Events, which are more optimized than Trigger Events.
Performance Notes
Movers aren’t too expensive on their own, but moving large amounts of items can be expensive. We have made optimizations for Movers that should help with that. By default, Movers have “Trigger Events” setting disabled. If you enable “Trigger Events”, your Movers will start to impact performance, so event trigger movers should be used carefully.
Mover Train only has 1 hidden event volume when using Custom Type which is at the center of the movement.
Generally you should try to use Mover Simple for your movement needs first as it’s less demanding, then try Mover Path.