I have a model that’s at 22k vertices, and it’s under the limit, and I always have to second guess everytime I upload to be like “I know that tower unite adds atleast 7k vertices more”
and when I uploaded it yesterday, the 22k vertices became 33,667 vertices, and what is up with that? why is tower unite importing adding more vertices than it should do? cause I think it’s BS and disappointing when you are rigging the model done after hours of work, and then bam, can’t upload it cause tower unite adds more vertices.
1 Like
Can’t comment on your particular situation as I don’t know the details of your models, but you may want to take a look at the “Reducing Vertex Count” section in this Steam guide:
2 Likes
I already know that one, but that’s not what I am asking, I have a model, its in blender, the vertices says 22k, when I then import it into Tower unite, the import adds more and over 30k which makes it very frustrating, so why is that?
This usually happens because of different smoothing groups on joined surfaces. Think of a cube for example: it really only has eight vertices, but the hard edges would require separate smoothing groups to make it render properly (and not like some weirdly smooth-lit blob). I don’t know where, but somewhere in the chain of editing models, exporting them, and importing them in TU, these vertices are split to make separate surfaces based on the smoothing groups. So, in the case of the cube: there are six separate squares of four vertices that make up the model, which makes for 24 vertices instead of the 8 “real” vertices.
That is my guess at what is happening. So take a look in your model at how many hard edges there are, as opposed to smoothly shaded surfaces.
Edit: it looks like this phenomenon is also covered in the article that CarbonCopyCat provided.
3 Likes
So to make it render properly, tower unite really has to add 7k more to make it look pristine even when it looks like a microwaved barbie? Why not just lift up the limit of those vertices just a bit more so that we can upload atleast 25k vertices models, cause you are giving us 30k, but we can’t even go over 20k cause the thing you are saying is stopping us from doing so.
Also the textures looks “melted” too at certain times, which is slightly weird.
I have to specify that this vertex splitting phenomenon is not necessarily Tower Unite’s doing, but an engine limitation. I just verified this with the default cube in Blender, exported it as an FBX file and imported it as a static mesh in the Tower Unite editor and sure enough, the vertex count says 24 instead of 8.
Now, as outlined in that Steam Community guide, another factor that leads to vertices being split are UV seams. So that is another part to look at in your model.
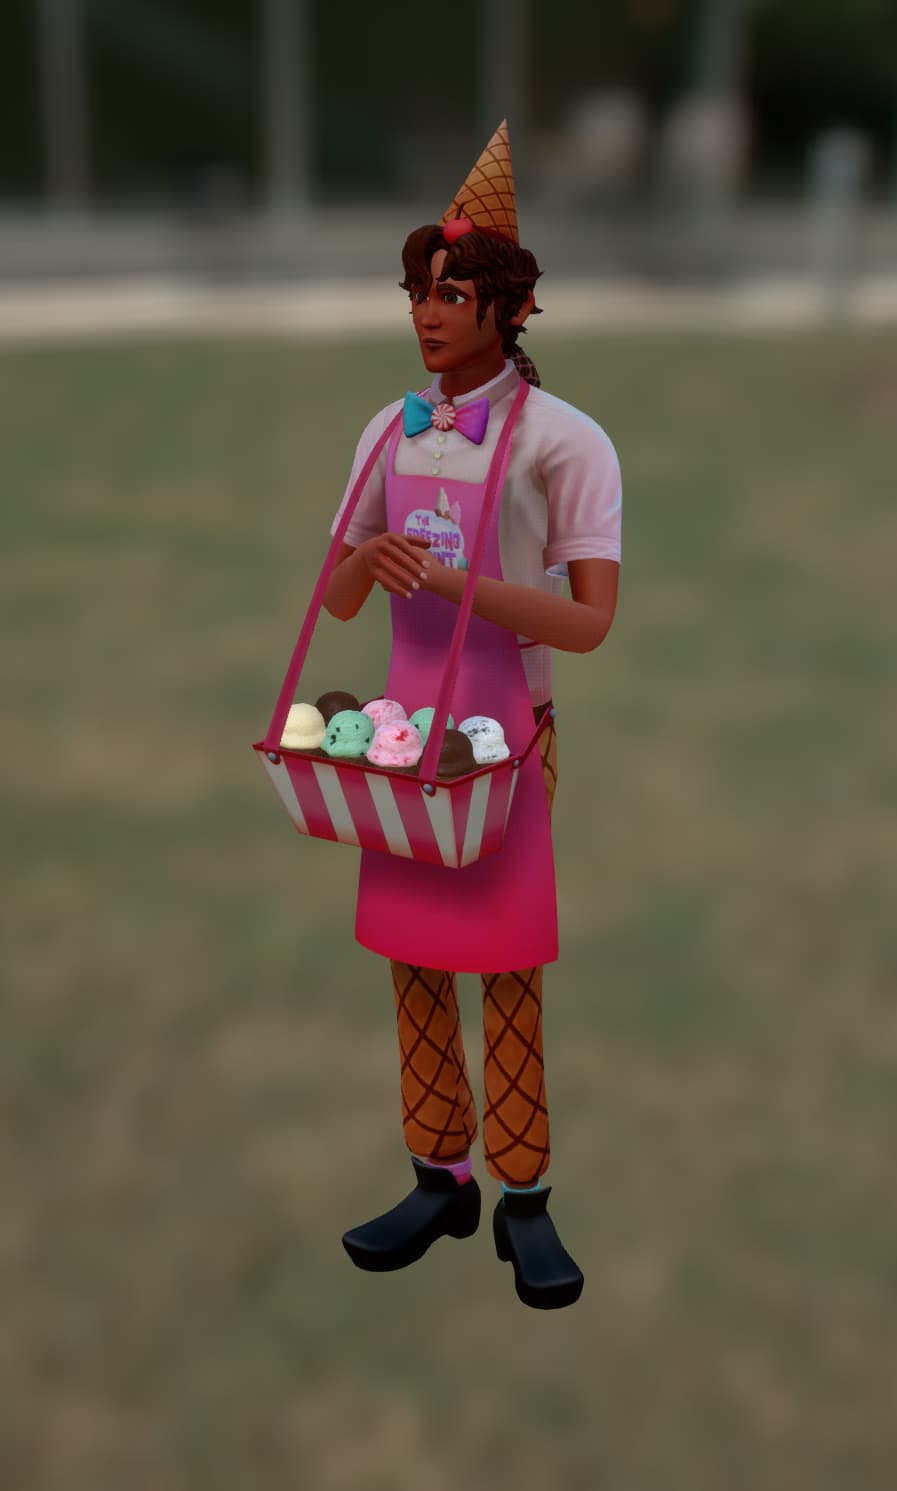
We are not increasing the vertex limit, and the reason for this is mainly two-fold. Firstly, there is plenty of potential for detail with 30k vertices. Chilly Billy, an NPC we have in the arcade, imports with a “split” vertex count just shy of 22k vertices, and that is a character holding a basket of ice cream cones:
Secondly, and most importantly, Workshop player models need to be imported at runtime as soon as a player enters your vicinity. At some point in the process, the “game thread” needs to come into action to make the model available for rendering. And this is where hitches can occur, because the game thread is the main process that a lot of the game’s logic runs on (and we don’t have much say in that, unfortunately). That is why you can sometimes experience intermittent stutters in the plaza and in condos, because someone could be wearing a Workshop model that needs to be loaded from a Workshop asset. Logically, the more data in the model, the more pronounced the stutter is.
I hope this helps with understanding the fact that models for Workshop can’t just be as detailed as one might want. You may be a game developer for example, and as a developer you can easily choose to make the main character model in your game like 200k vertices, just to name a number. And that is fine, because that asset will be in the game at compile time, so no loading big assets while walking around in a map.
What you could do is use some decimator modifier in Blender to slash the detail to an acceptable amount. I’m not much of an experienced modeler myself, but there are other players who are proficient with Blender and they could help you out in this thread if you share the Blender project file, for example, or show some screenshots. You could also ask for help in the #workshop channel in our Discord server.
I hope this helps!
5 Likes
So if you guys aren’t willingly to raise the vertex limit, then I will keep having these issues such as a sims 4 model in blender having 22k vertices, but then I can’t upload it cause tower unite adds more when you upload it.
also melted textures, and ripping seams.
All of the things you say can explain a bit of it, but I ain’t buying it, how come a NPC can look better than my model that comes from a less complicated model?
I feel like you guys need to fix the issue rather than just accepting that everyone needs to look like microwaved crap in tower unite.
Although the game’s workshop tools currently have issues in some areas, 22k vertices is already a fairly high vertex count for a model, so I don’t think increasing the vertex count would solve your issue of your model looking like “microwaved crap”; rather, the issues with your model seem more likely to be down to user error. There are many visually appealing sub-10k vertex models on the workshop already, so the issue is more with proper use of those vertices, rather than the vertex count itself.
As stated previously in the thread (and in the linked Steam guide), Blender and Unreal Engine 4 (used for Tower Unite) parse models differently, causing vertex counts to differ between the two programs due to various reasons. Minor differences in vertex count are expected, but an increase in 8k+ vertices is unnatural, and is likely due to not having your model configured properly in Blender before exporting to Tower Unite (i.e. applying smooth shading, removing excess UV maps, etc.). I would highly recommend properly looking through the “reducing vertex count” section of the Steam guide listed above and troubleshooting your model first, as that portion of the guide was specifically written to address such unnatural increases in vertex count when exporting to Tower Unite. Doing so will likely reduce your vertex count down to acceptable levels.
Furthermore, there’s ultimately a limit on what troubleshooting suggestions can be made when you only provide a written description of your model’s issues. Although I do understand your frustration with the importing process (as it can be complicated for new users), it may be more constructive to post a screenshot of your model in Blender and Tower Unite, particularly of any examples of your “melted textures” or “ripped seams”. Doing so may make the issue with the model known, allowing for proper troubleshooting steps to be issued.
3 Likes
That’s fair, and I’ll gladly show you the issues that I am talking about.
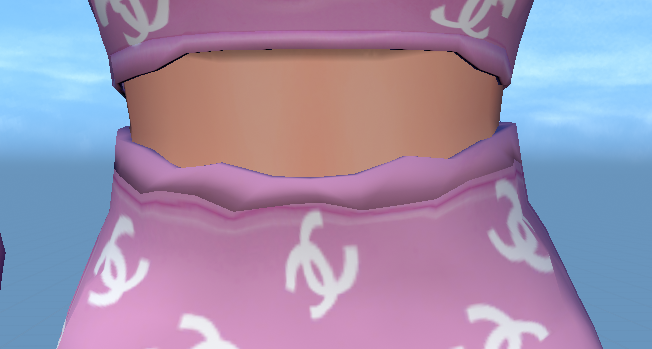
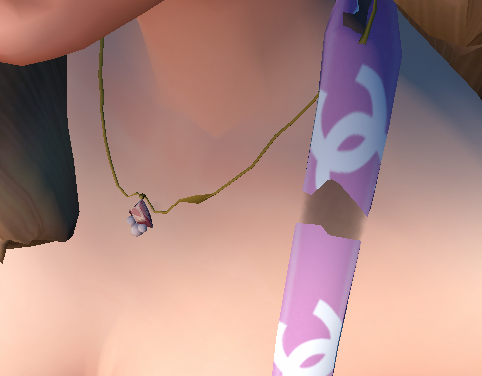
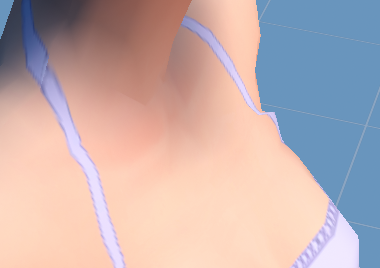
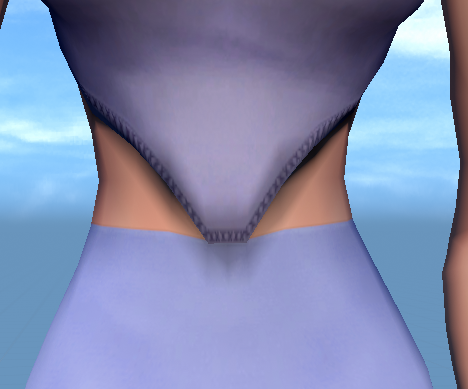
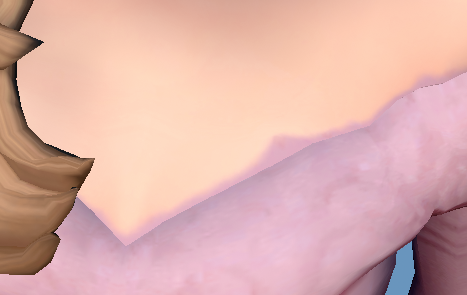
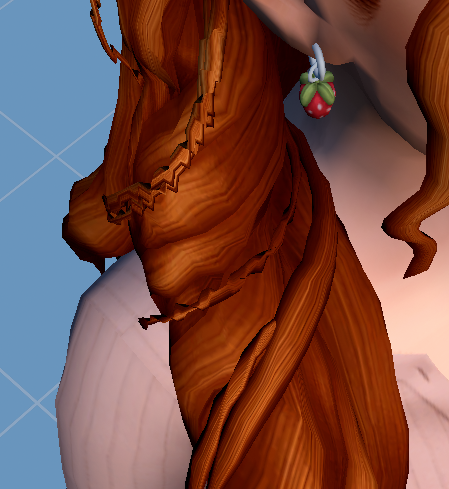
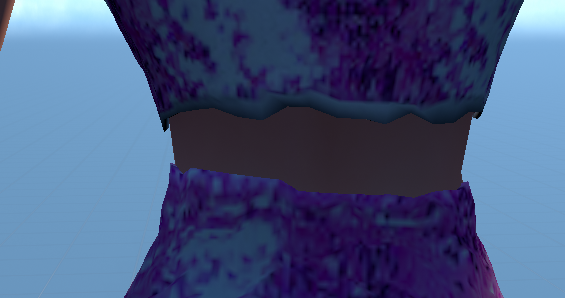
So here I am showing you some of the models i’ve uploaded, they are all from Sims 4, and I know that Sims 4 isn’t the best when it comes to rendering a model fine or whatever, but I can assure you, this is not a sims 4 issue, in blender they look fine, smooth, and no “crinkle” effect or “microwaved” effect, but when uploading in Tower unite, the models just ends up looking like that, the textures bleeds into the model, and individual strands of hair will have that weird crinkle wave effect.
I just want tower unite devs to give us better tools for uploading, VRCHAT succeeded when it came to the model uploading, and I feel Tower unite is relying much on the workshop from steam to do its job.
As one of the many groups of many model uploaders, we kinda want better tools to work with.
What I do in blender is that I fix the vertex groups, I remove high costly cc necklaces that remove the vertices count, and yet my models looks…like this.
this is always an EXTREMELY unfair comparison to be made when comparing tower unite’s workshop support to vrchat’s custom avatars. vrchat was quite literally built around the concept of creating your own avatars, not to mention you actually need to download the unity engine to set up a model for it. of course you have a lot more freedom with vrchat as you are literally using the game’s engine to create content.
tower unite on the other hand simplifies this creation process by only needing the model set up to its skeleton, and this isn’t just because its simpler to the model maker: unreal does not have a great way of loading content like custom playermodels at runtime, so the workshop model loading system is entirely custom code by the devs
aaanyway, with that digression out of the way, it seems like the issues with your models specifically comes down to how its weight painted. naturally you dont have this issue from the source material since these models are built for it, but thats a tradeoff that comes with porting models to games that are a bit restrictive like tower. the “melting” effect is because there are more than one vertex groups acting on those vertices pulling them in multiple directions. 90% sure that smoothing out these weight paints and making sure they’re as precise as possible will alleviate these issues
2 Likes
I’m going to take a wild guess here and say that you only wear anime models and they are from modelresource website.
Nope! I’ve gotten the models I’ve ported from various different places
Hiya! Stumbled upon this post, I think we happen to know each other! ^^ (For context, I sometimes help OP out with pulling the Sims 4 characters into Tower Unite.)
The ripped Sims 4 characters always have a lot of overlapping vertices. Sometimes this is to get the same effect as the smoothing groups mentioned before, (forcing hard edges in shading) and sometimes just because the tool for ripping the models isn’t ripping them flawlessly.
Fixing those overlaps is one of the main things you can do to lower vertex counts on these particular models. Using Merge by Distance on these areas is typically the fastest and easiest choice for fixing them. (This is also covered in the guide posted by Madmijk. It’s a great learning resource!)
The NPC’s are tailor-made for Tower Unite, and weight painted by hand to work well with a Tower Unite rig. The Sims 4 characters are not. They’re designed to work with a Sims 4 rig. Thus, the reason we get the crinkly effect is because we’re using the Sims 4 weights directly from the ripped model, without cleaning them up.
There are two issues with this. These weights line up perfectly with the bones in the Sims 4 rig, but not with the bones in the Tower Unite armature. So as the bones are animated in Tower Unite, some vertices may get pulled in directions that they weren’t meant to.
The other issue is that some vertices have too many influences as-is. In Blender, this effect is largely negligible, and thus invisible even when using the TU poses. (This is especially noticeable on clothing as the spinal bones compete for influence with different areas.) However, when imported into Tower Unite, these extra weights become somehow exaggerated, and cause crinkly vertices.
(Even with the default Tower Unite animations being a bit broken, I’m not sure why this effect is so pronounced in-game, but not in Blender. After testing, it doesn’t seem to be a rounding error or a normalization problem. While the engine does apparently have a maximum of 8 weights per vertex, the problem also still happens despite being well below this limit.)
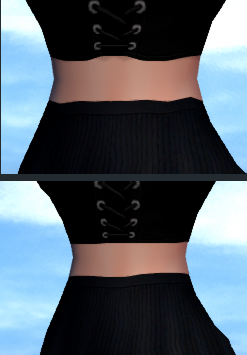
A quick fix that I found (while writing this post!) was to select all the crinkly areas on the Sims 4 character, going into Weight Paint mode, and clicking Weights->Limit Total, with a limit of 2. The result, as shown in Tower Unite, seems a lot cleaner.
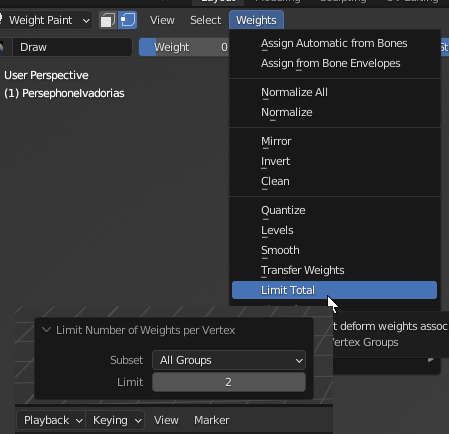
A limit of 2 carries a small risk of breaking some parts of the model, but you can just undo the action, deselect the problematic area, and try again, if needed.
Note: Especially the pelvis, and any long hair, require at least 3 vertex groups to animate cleanly. The pelvic vertices need to follow the pelvis and 2 thigh bones, and long hair often needs to follow the head, neck, and upper spine. Use a Limit Total count of 3 for these particular areas.
Yeah, unfortunately for us, Tower Unite isn’t as freeform as VRChat here. But it’s not due to developer laziness. They’re forced to make these trade-offs due to limitations in development time and performance budget, among other things.
In any case, this isn’t the main reason behind the vertex count increase, which is caused by a combination of Unreal Engine 4 quirks and us working with very messy models.
No need to get personal, they’re offering help! And it was entirely true what they said. It’s what helped me realize just how crazy many groups were on each vertex! (Many thanks!)
9 Likes
This was super informative and really helpful, thanks for adding this on!!
2 Likes