What is Condo IO?
Condo IO stands for Condo Input and Output. It’s a powerful set of tools and integration with items that allow items to connect with each other and preform actions based on gameplay events.
At bare minimum: Press Button → Open Door
How Do You Use It?
Condo IO will be embedded into items for you automatically.
You can connect items in two ways:
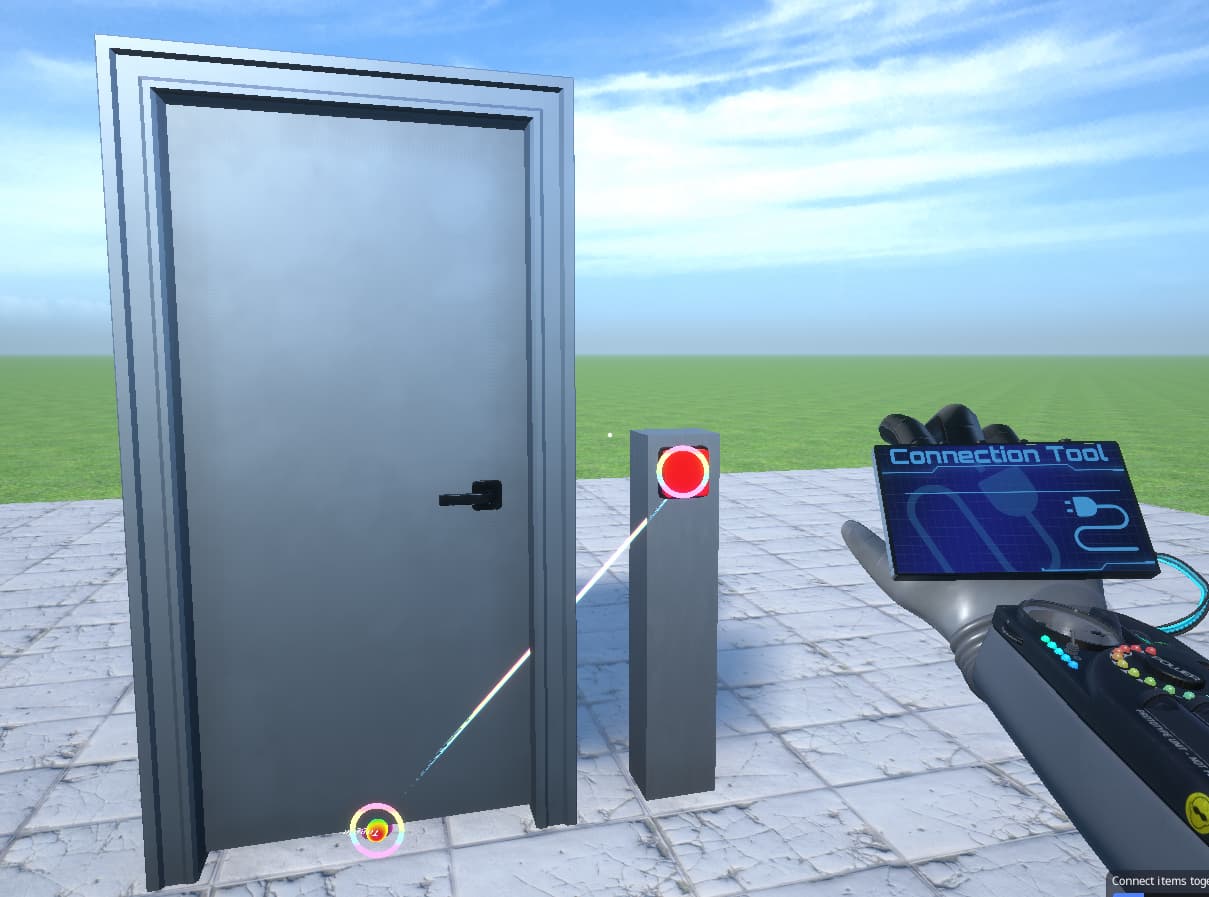
The Connector Tool
- Part of the Tower Glove, this tool will allow you to click on two items and form a connection. By default, the Connector Tool will pick the most common input/output events for you.
Item Properties → Connections
- You can then further edit item interactions by editing items and going to Connections (or click on the Connections tab in the item properties menu).
Overview
Condo IO is is a feature that does not require any programming knowledge to create various creations such as puzzle maps, adventure stories, organization tools (such as turning off all lights in a room), and eventually custom games all within your Condo or Condo Workshop maps.
The tools are designed to be easy to understand, intuitive, and straight forward.
The Basics
Connector Tool
The Connector tool is part of the Tower Glove, which allows you to quickly connect items together.
Inputs and Outputs
Item have Inputs and Outputs. An Input can be used to change properties of an item, such as setting color or opening a door. An Output occurs when an item has changed, such as a door opening or a button being pressed.
For example:
Button (OnPressed)→Door (Toggle)Door (OnDoorOpened)→Light (TurnOn)
Many items have various Inputs and Outputs, such as the Canvas has a SetCanvasURL input, Trigger Volumes have OnTriggered, etc.
When using the connection tool, you can scroll through the outputs before making the connection. You can also adjust these inputs and outputs using the connection editor.
Persistent Connections (Connecting Cameras to Mediaplayers)
Certain items can connect regardless of events. These types of connections are referred to as Persistent Connections and will save their connections.
Items such as Game Consoles (Libretro) or Security cameras can connect to Mediaplayers regardless of events, such as:
Camera~Mediaplayer→ Camera Feed Displaying on Mediaplayer Screen
You will only need to make a connection with the connection tool and the system will handle the rest.
Delayed Events
You can delay output events.
Example:
Button→Open Door (0 seconds),Turn On Lights (2 seconds)
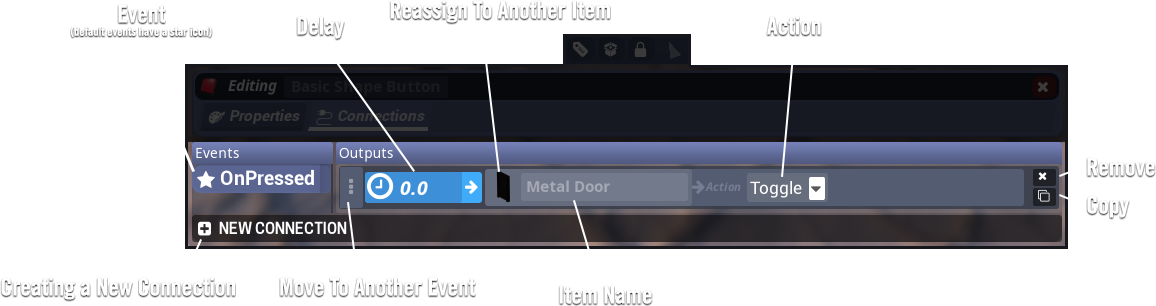
Connection Editor
Edit connections directly within the item property menu (right click > Connections)
In the connection editor you can set delays on events, change inputs and outputs.
Core Inputs
Core Inputs are inputs that ALL items have, regardless if they have any editable properties to begin with.
Core Inputs available: Hide, Unhide
Example:
- Button → Canvas → Hide
- Button → Canvas → Unhide
Note: Hiding an item will disable both visuals and collisions.
There are also core color inputs on all colorable items that are automatically created for each colorable piece of an item.
Logic Modules
There are many logic modules that can be used to organize or adjust the events in unique ways.
-
Relay
- Organize IO events by grouping them into a single Relay
-
Random
- Selects a random output from a preset number of output events (up to 32 outputs)
-
Toggle
- A logic item that calls two separate outputs that get toggled between when activated. Useful for toggling multiple things on/off. Will call Off on load. This is a boolean
-
Counter
- A counter that counts a number then fires off when its max or min is reached. Can be reset to restart the count. Counter can optionally save its value persistently. You can Add, Subtract, and even Multiply and Divide the counter
-
Timer
- A timer that keeps track of time passed. Can be adjusted to loop, select random times between min/max, pause/unpause
-
Laser Beam
- A laser beam that can be set to be blocked, or deal damage. Can be fed into a Laser Beam Receiver for gameplay logic.
-
Laser Beam Receiver
- A module that will only activate if a Laser Beam is pointed into it.
Volumes
Along with modules, there are various placeable Volumes available to help drive gameplay events or adjust players. These Volumes are generally visually hidden to players.
-
Trigger Volume
- Will call Output events when a player has walked through it.
-
Damage/Heal Volume
- Damages or heals players that walk into it. Can be set to damage over time or just once.
-
Push Volume
- Pushes players in a direction once walked into.
-
Blocking Volume
- Blocks players from walking into it, an invisible wall.
-
Gravity Volume
- Adjusts player gravity.
-
Player Movement Volume
- Adjusts speed of players, or disables jumping or crouching
-
Size Volume
- Adjusts the size of players, basically applying size potions to players.
-
Teleport Volume
- Teleports players to a different locations. This works just like the other Teleport items in the game, but it’s a hidden one. You can also toggle it to be a Use prompt.
-
Button Volume
- A placeable button that is invisible. Useful to add buttons to custom set pieces.
-
Comment Volume
- Displays text on players HUD when looked at.
-
Water Volume
- A placeable water volume that players can swim inside it.
Input Items
Items players can interact with to have things happen.
- Button
- Canvas Button
- Hidden Button
- Keypad
- Lever
- Physics Object Slot
- Takes a physics object when you put it into it (can be filtered by name)
Built-In Item Events & Variables
Many items that have interactions such as Doors come with events you can hook into, such as Door > OnOpened
Examples:
- Doors: OnOpened, OnClosed, Open, Close, Lock, Unlock
- Buttons: OnPressed
- Lights: Turn On, Turn Off, OnTurnedOn, OnTurnedOff, Set Intensity, Set Color
- Fireworks: OnIgnite, OnLaunch
- Food: OnBite, OnConsumed
- Damagable items such as Balloons, Bell, etc.
- Media Player: OnMediaStarted, OnMediaEnded
- Physics: OnPickedUp, OnDropped, OnDamaged
- Special: Spin To Win, Dice, Bed
Items also have Variables you can change.
- Button → Set URL on Canvas
- Button → Set Color on Light
- Button → Set Time on Timer
Extras
IO items are infinite
- IO items have no Unit cost, you will not have to go to the stores to place down Volumes or Buttons or Logic
Organization Tools
- You can rename items to a custom name to help with IO
- You can also color Relays and IO nodes
Misc IO Items
- Custom Spawn Point
- Used to set the spawn point of players. Can also be used as checkpoints.
Future Updates
We plan to release Condo IO features in rolling updates
In order of importance…
- Mover Module (for moving items and creating moving platforms)
- Workshop Sound Packs
- Default Properties: Hidden, Interactive Permissions
- Saving a Default state of an item
- Additional Input items (buttons, etc.)
- Additional Logic items
- Additional Volumes such as Post Processing Volume, Day/Night Volume
- Keys for Doors
- Custom Condo Currency
- Can be used for puzzle maps, awarding players for being on your condo, etc. It is persistently saved to the Condo data itself.
- Pickups (weapon, health)
- Sensors
- Sensing when a player has done an action (i.e. OnDeath, OnChatMessage, etc.)
- NPCs Enemy/Friends
- NPC Waypoints
- Player Stats: Lives / Deaths / Points / Team
- Cameras (for cinematics)
- Map Optimization Volumes, Snapshot Loader, Workshop Map Portal (linking workshop map levels)
- Layer system - Ability to assign a layer to items with the ability to toggle on/off the items within a layer
- Gameplay Rules
- Physics toggle for items
- Physics modifiers
- Custom Objectives
- HUD/FX effects
- Items designed for puzzles
- And More!
We’re excited to continue to add new ways to create interactive experiences within your Condo, and by extension, open up new types of level creation tools using the Condo system within Tower Unite.
Example Use Cases
Automatic Lights, only when room door is open:
We suggest using Relays. Relays allow you to combine many actions into one spot for quicker editing in the future.
-
Door (OnOpened)
Door→Relay1→Fire -
Door (OnClosed)
Door→Relay2→Fire -
Relay1 (OnFired)
→Light1TurnOn
→Light2TurnOn
→Light3TurnOn
→Light4TurnOn -
Relay2 (OnFired)
→Light1TurnOff
→Light2TurnOff
→Light3TurnOff
→Light4TurnOff
Locked Door, Key Unlocks
- Spawn a
Door - Edit the
Doorand set Locked to enabled. This will prevent players from opening the door with use. - Spawn a
Physics Item Slot - Connect the
Physics Item Slotto theDoor(using the Connection Tool) and set the action toOpen - The
Physics Item Slotwill now open the door once a physics item is slotted into it - Note:
Physics Item Slotalso has a key matching system based on the key’s name. You can use this to make it so specific keys only slot into the physics item slot. You can also hide the Physics Item Slot from being visible in its settings.
This post will be continuously updated as we build on these features.